For admins using GIJITO for the first time
Admin Start Guide
From setting up your account to approving your first minutes
Your organization is
The guide changes to match your organization. If you opened it from our email, the right one is already chosen.
Getting started
How to use this guide
GIJITO turns a meeting recording into text, and AI drafts the minutes for a person to check and approve. This guide takes you through your first tasks as an admin, using the real screens.
Part 1 · Admin setupOnly the admin does these steps
- STEP 1Set up your admin accountSet your password from the email you received.
- STEP 2Check your first screensNote the trial period and account limit, and see how the screens are laid out.Read the welcome window, and see how the screens are laid out.
- STEP 3Add membersInvite the people who will use GIJITO with you, and give them seats.Give yourself a seat, then invite the people who will use GIJITO with you.
Part 2 · Your first meetingMembers follow the same steps
The numbers on each screen match the numbered steps. Follow them in order.
Under “Help” at the end of each step, you can open the full article. Articles with this mark show the steps in motion in their “Walkthrough”.
What you need
- A computer with Chrome or Edge
- The email address the invitation was sent to
- The email addresses of the people joining you
To see the whole flow first
Try everything from recording to approval with a made-up meeting, in about a minute. Nothing is saved.
Words used in this guide
- Account
- Each person's sign-in to GIJITO.
- Seat
- Lets a person record and use AI.
- Folder
- Holds meetings, and sets who sees them.
- Draft, approval
- AI minutes stay a draft until a person approves them.
- Item
- A decision, task or other point.
All company names, people, email addresses and meeting content in the example screens are made up. Seat names, limits and other values shown are examples, and may differ with your organization's settings or product updates.
Part 1 · Admin setup
Only the admin does these steps
STEP 1
Set up your admin account
Open the email you received, and set the password you will use to sign in to GIJITO.
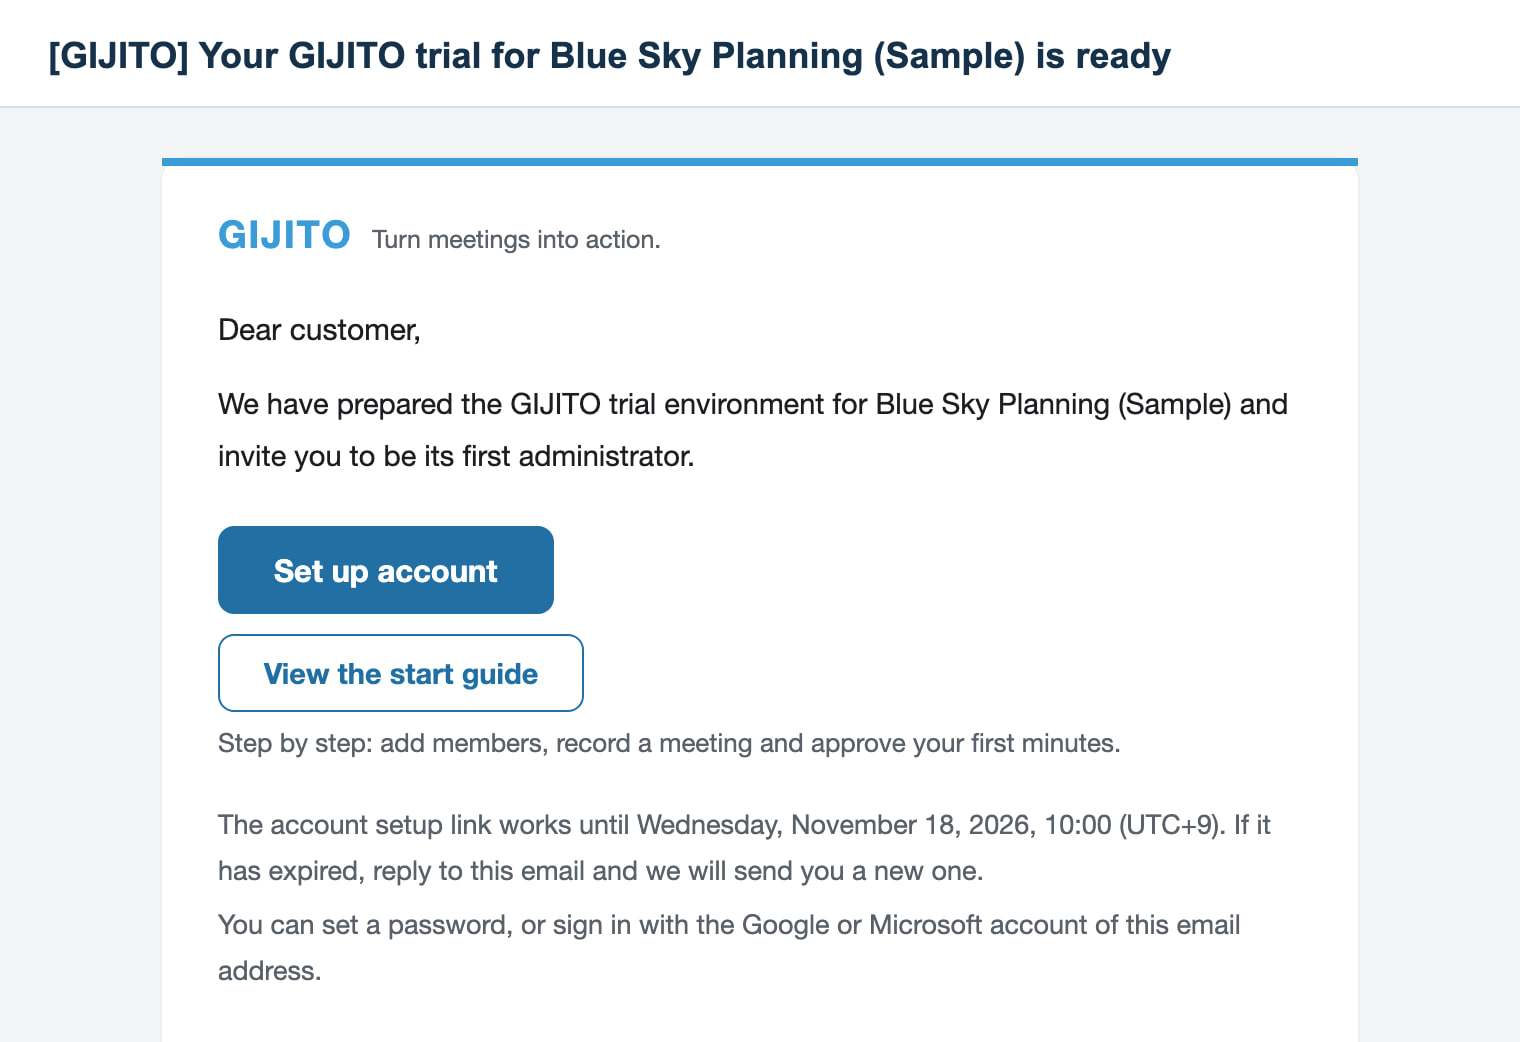
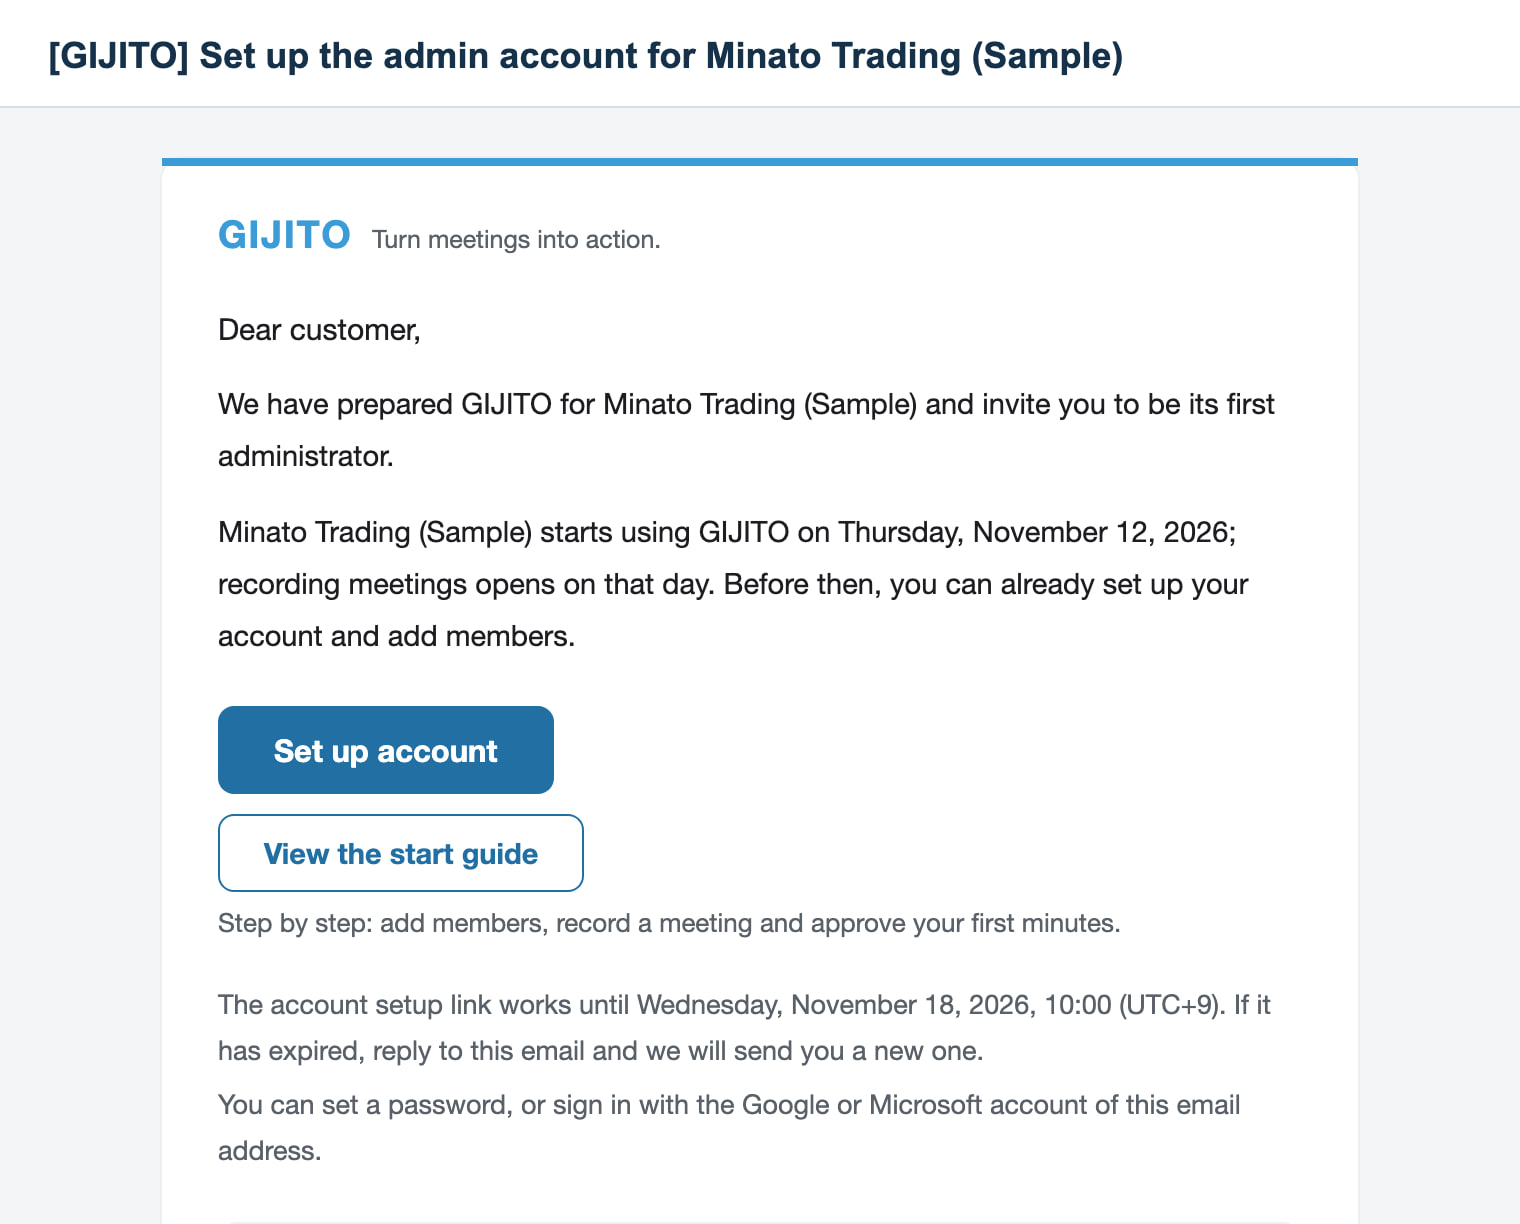
In the email, press “Set up account”
The subject is “[GIJITO] Your GIJITO trial for (organization name) is ready”.The subject is “[GIJITO] Set up the admin account for (organization name)”.
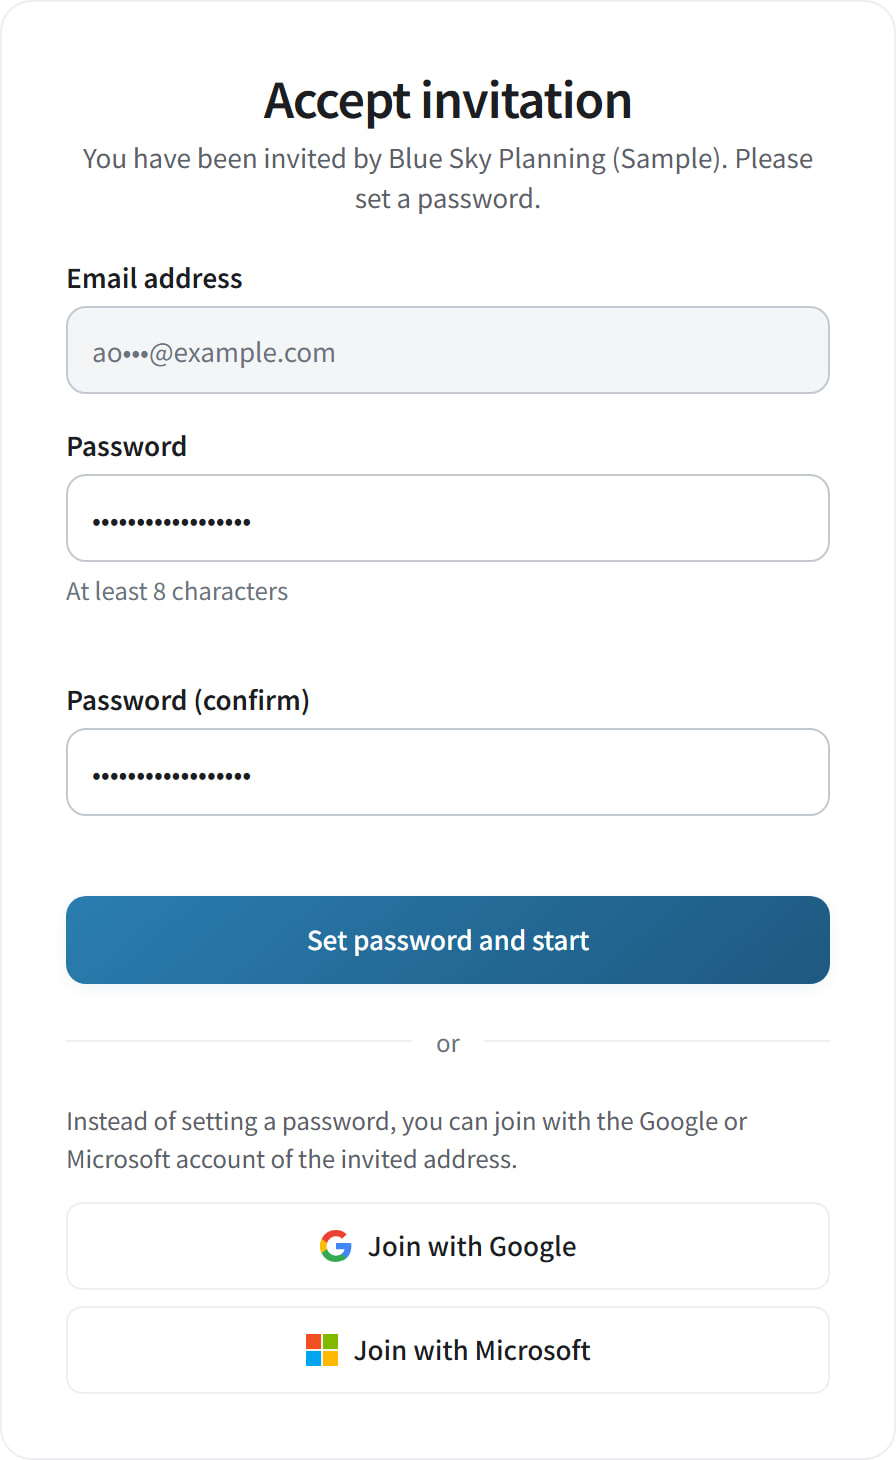
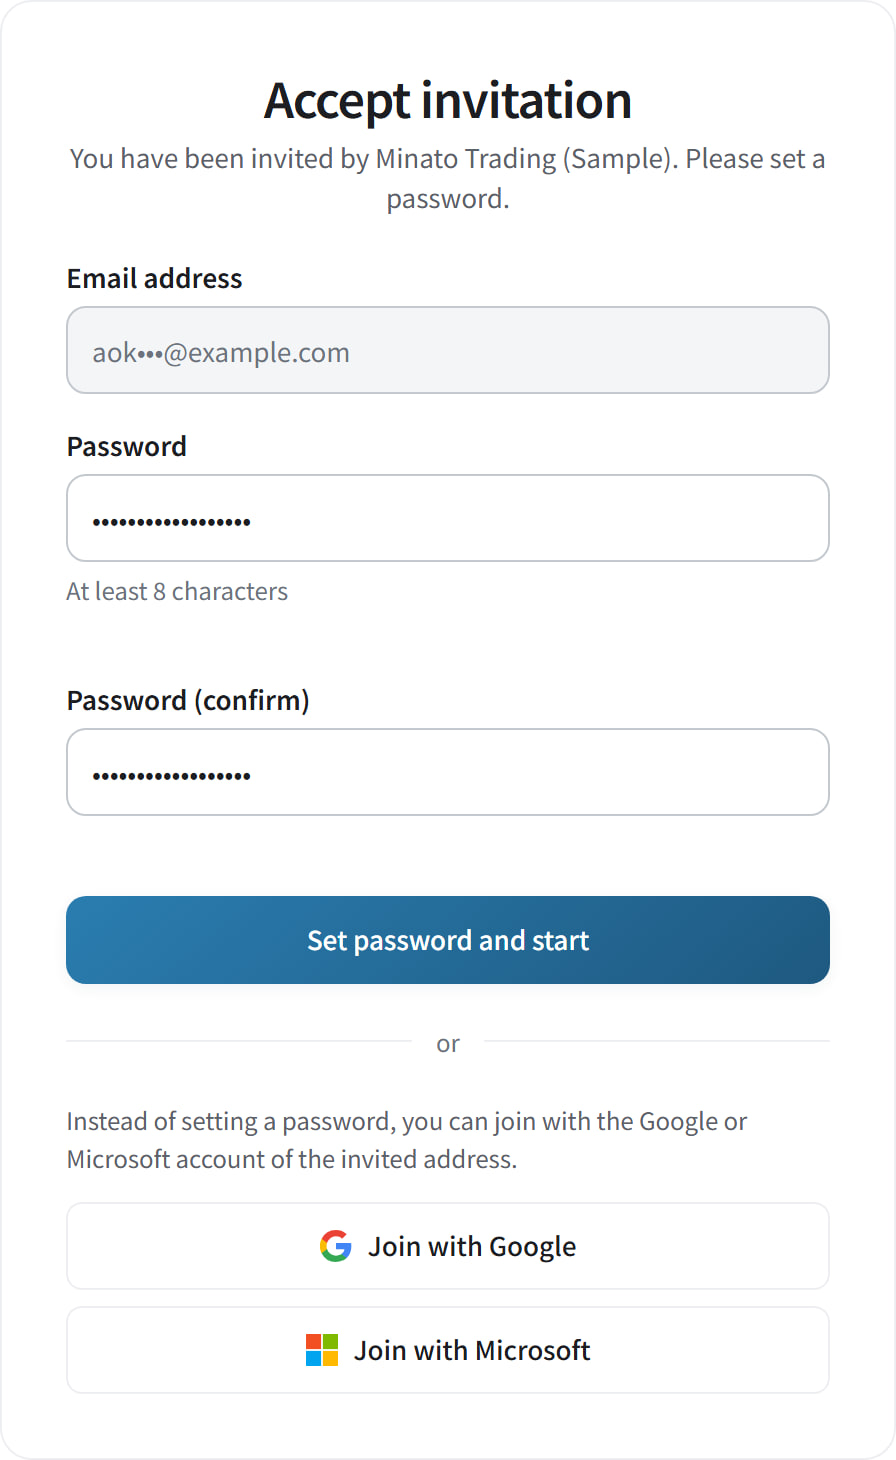
Check the organization name and email address
Part of the address is hidden with “•••”. It can't be changed on this screen.
Enter the same password twice
Use at least 8 characters, and make sure no red message appears below.
Press “Set password and start”
You are now signed in, and the “Organization administration” screen opens.
From next time, open https://app.gijito.com and sign in. If you forget your password, press “Forgot your password?” on the sign-in screen to set a new one.
STEP 2
Check your first screens
When you sign in, the “Welcome to GIJITO” window opens. Once you close it, it does not appear again.
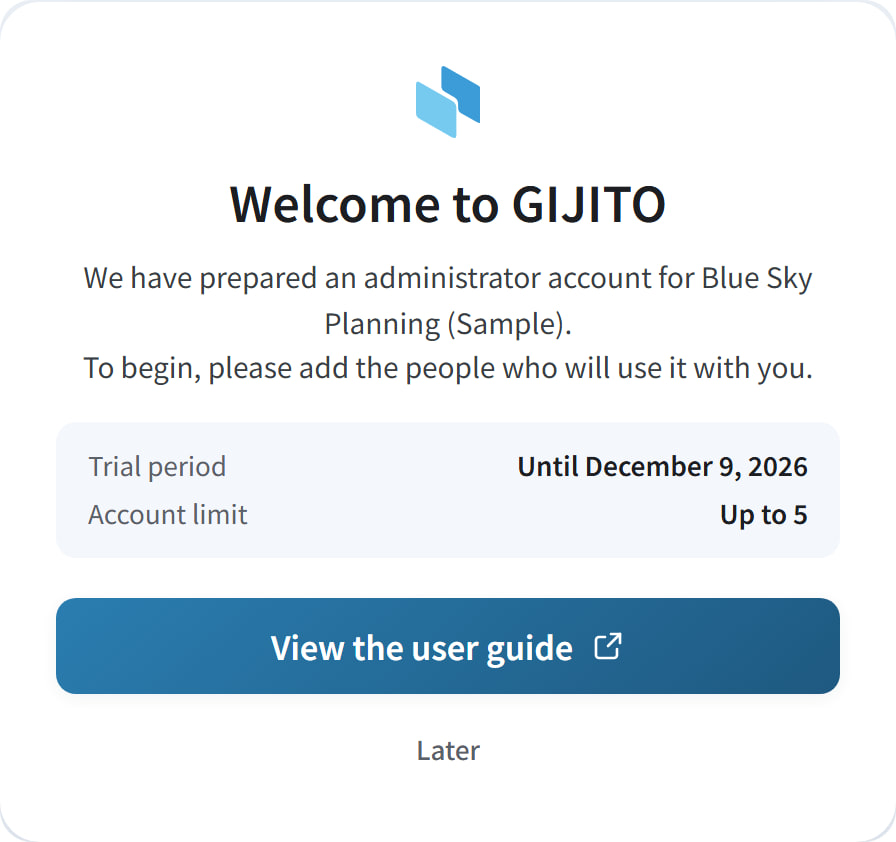
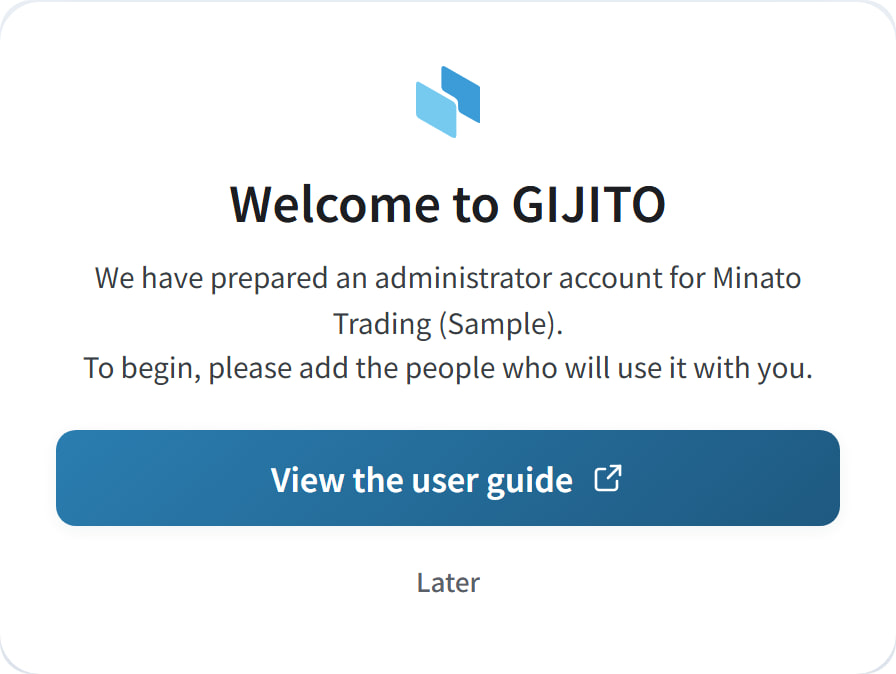
Write down the trial period and account limit
A trial organization sees the last day of its trial and how many accounts it can have. The last day is not shown again until the trial is about to end, so keep a note of it.
“View the user guide”
Opens this guide in a new tab.
“Later”
Closes the window and takes you to “Organization administration”. Choose this to continue with this guide.
You will move between two areas
The meeting screens
Recording, checking and approving minutes, items and folders. Everyone uses them. To get here from “Organization administration”, press “Back to meetings” at the top right.
Organization administration
Members and organization settings, for admins only. To get here from the meeting screens, press “Organization administration” at the top right.
The “Organization administration” menu
- Members
- Add members, and change their seats, roles and the features they can use.
- Usage
- See how much transcription time and how many AI credits each member has used.
- Minutes templates
- Create templates for your organization, and choose the default for new meetings.
- Glossary
- Add company names, product names and terms for all your organization's meetings.
- Features
- Decide who in your organization can use each feature provided.
- Audit log
- See a record of what was done in your organization.
- Data management
- See whether audio is saved automatically, and for how long.
- Organization settings
- See the organization name and time zone, and choose the language of invitation emails.
To begin, you only need “Members”. Use the other menus when you need them. If the screen says your organization is “still being set up”, see “About your term of use”.
STEP 3
Add members
Give yourself a seat
The first admin starts with “No seat”. To record, give yourself a seat first.
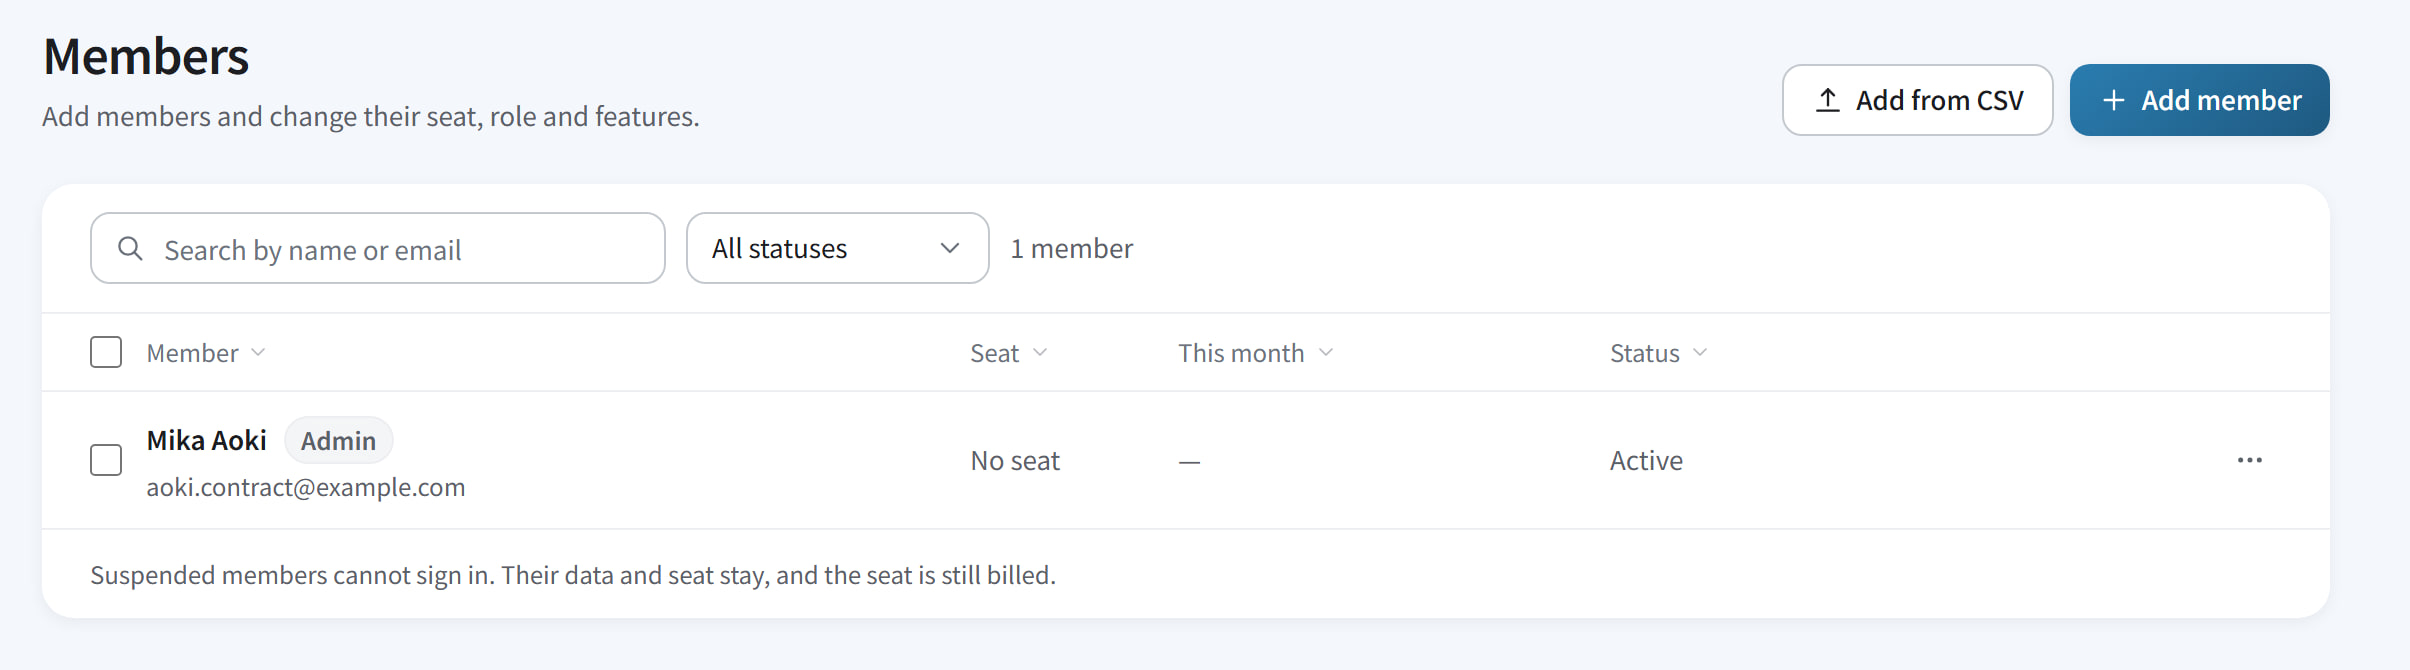
In the “Members” list, press your name
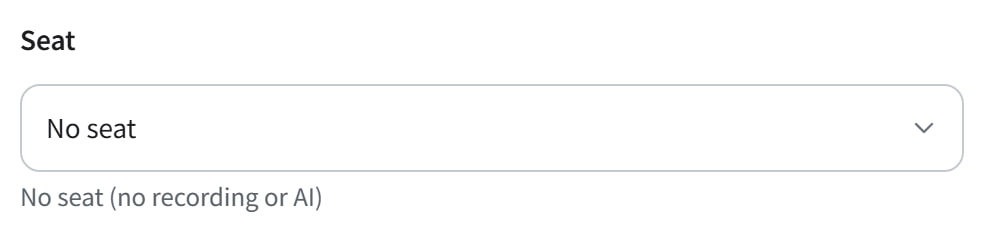
Your details open on the right, with “Seat” at the top.
Choose a seat from the “Seat” list
Only the seats provided to your organization are listed.
In the confirmation, press “Change”
In the month you add a seat, its allowance depends on how many days are left.
Moving to a higher seat
Applies right away, and the allowance goes up right away.
Moving to a lower seat
Applies on the first day of the next period, and can be canceled until then. Choosing “No seat” stops recording and AI features right away.
Enter the email addresses of the people who will use GIJITO with you, and send them invitations. This example adds two people.
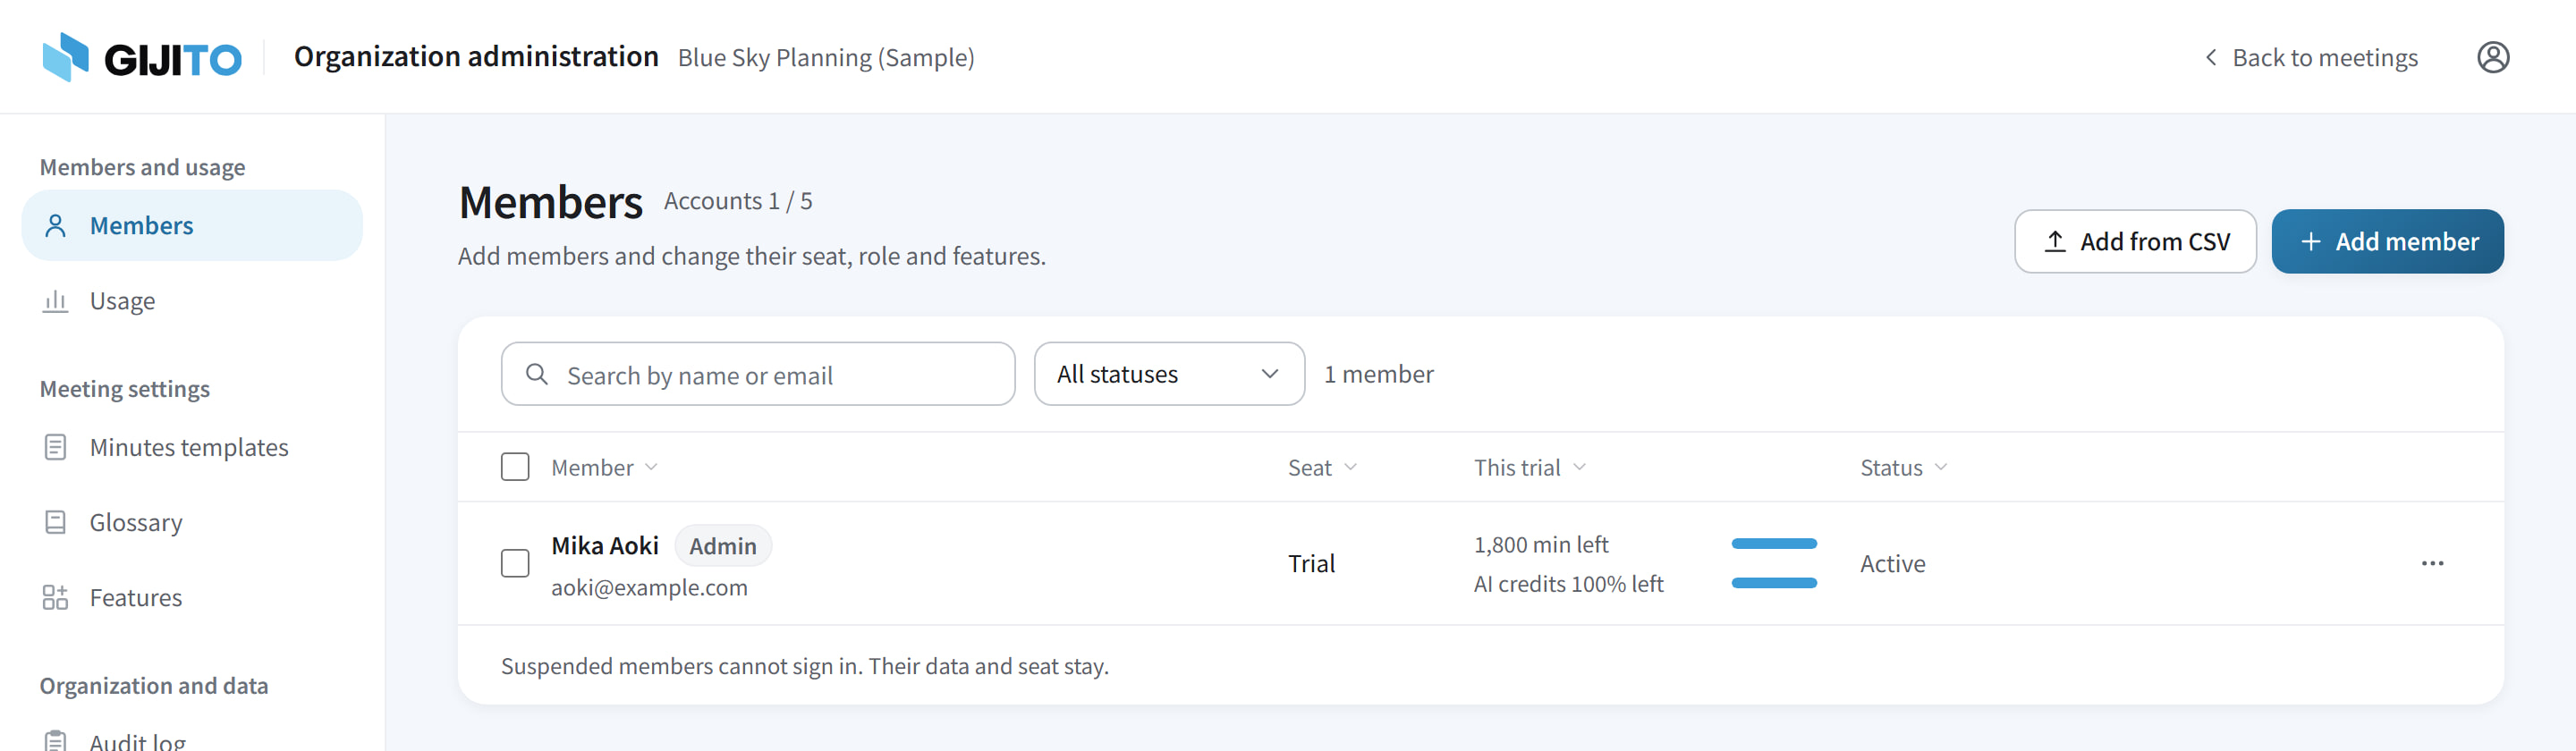
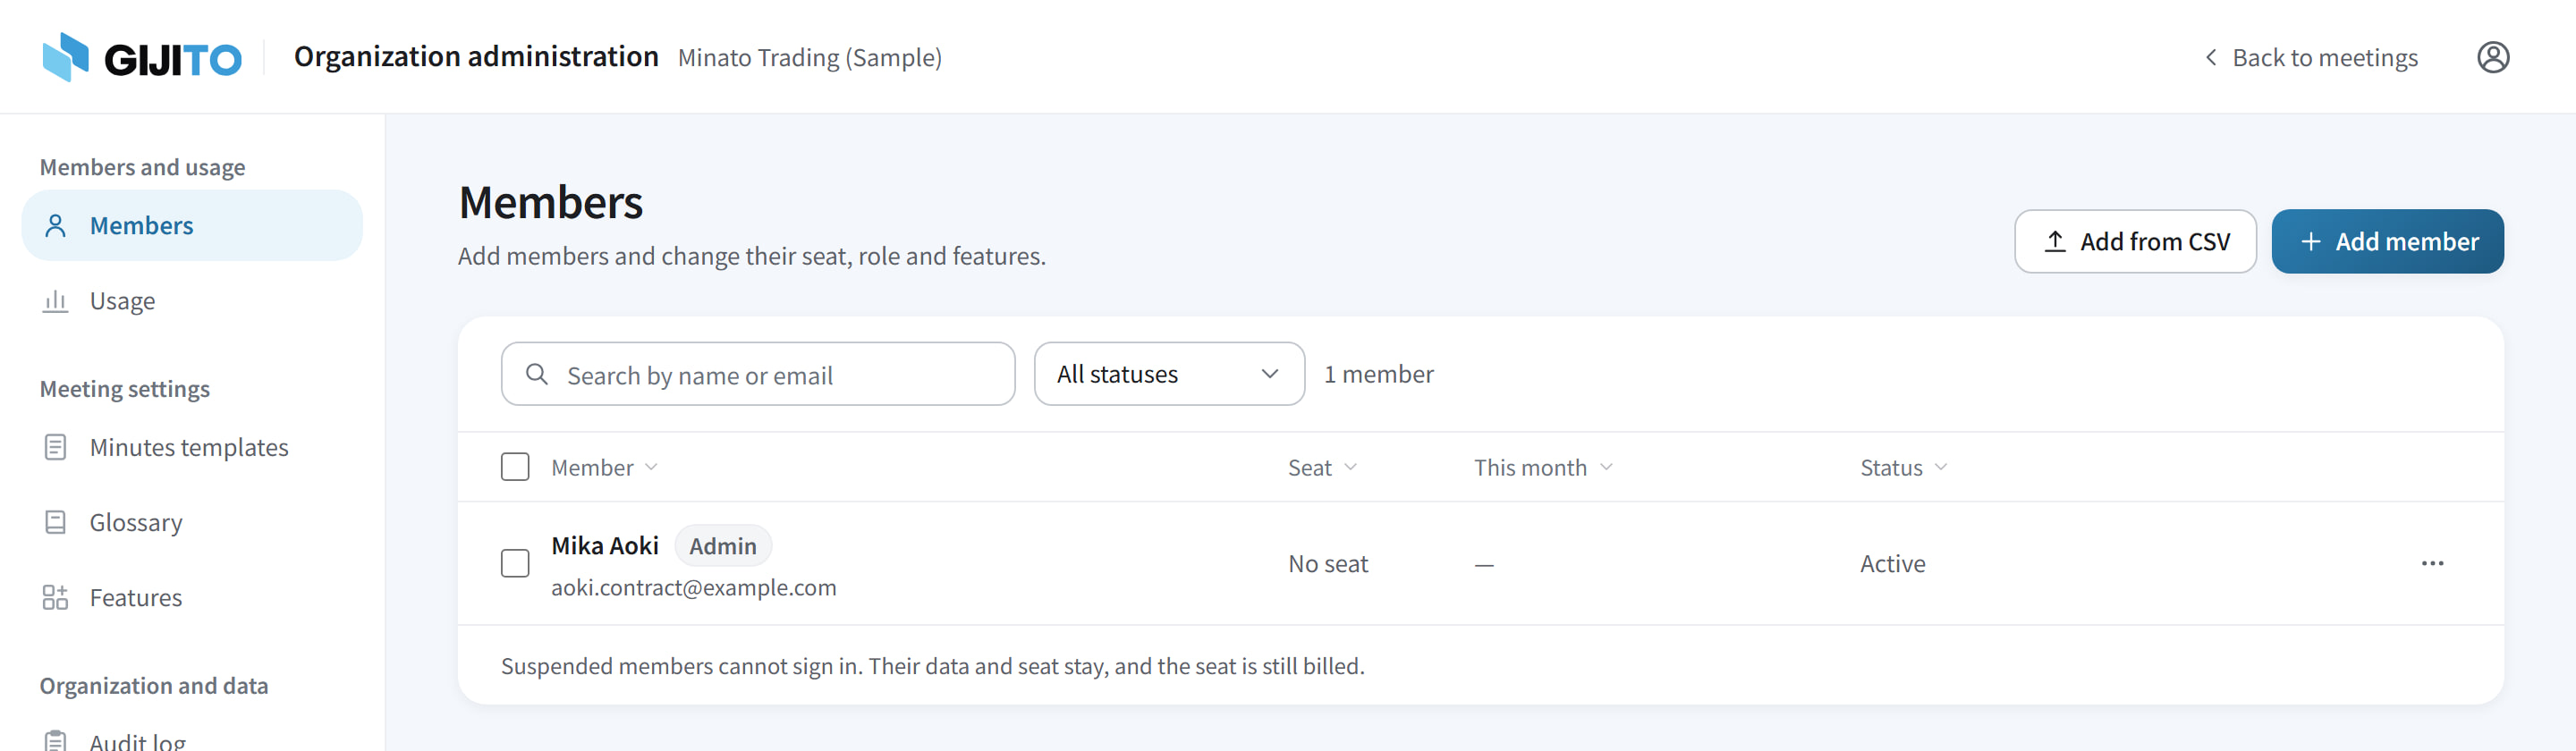
Open “Members” in the left menu
Press “Add member”
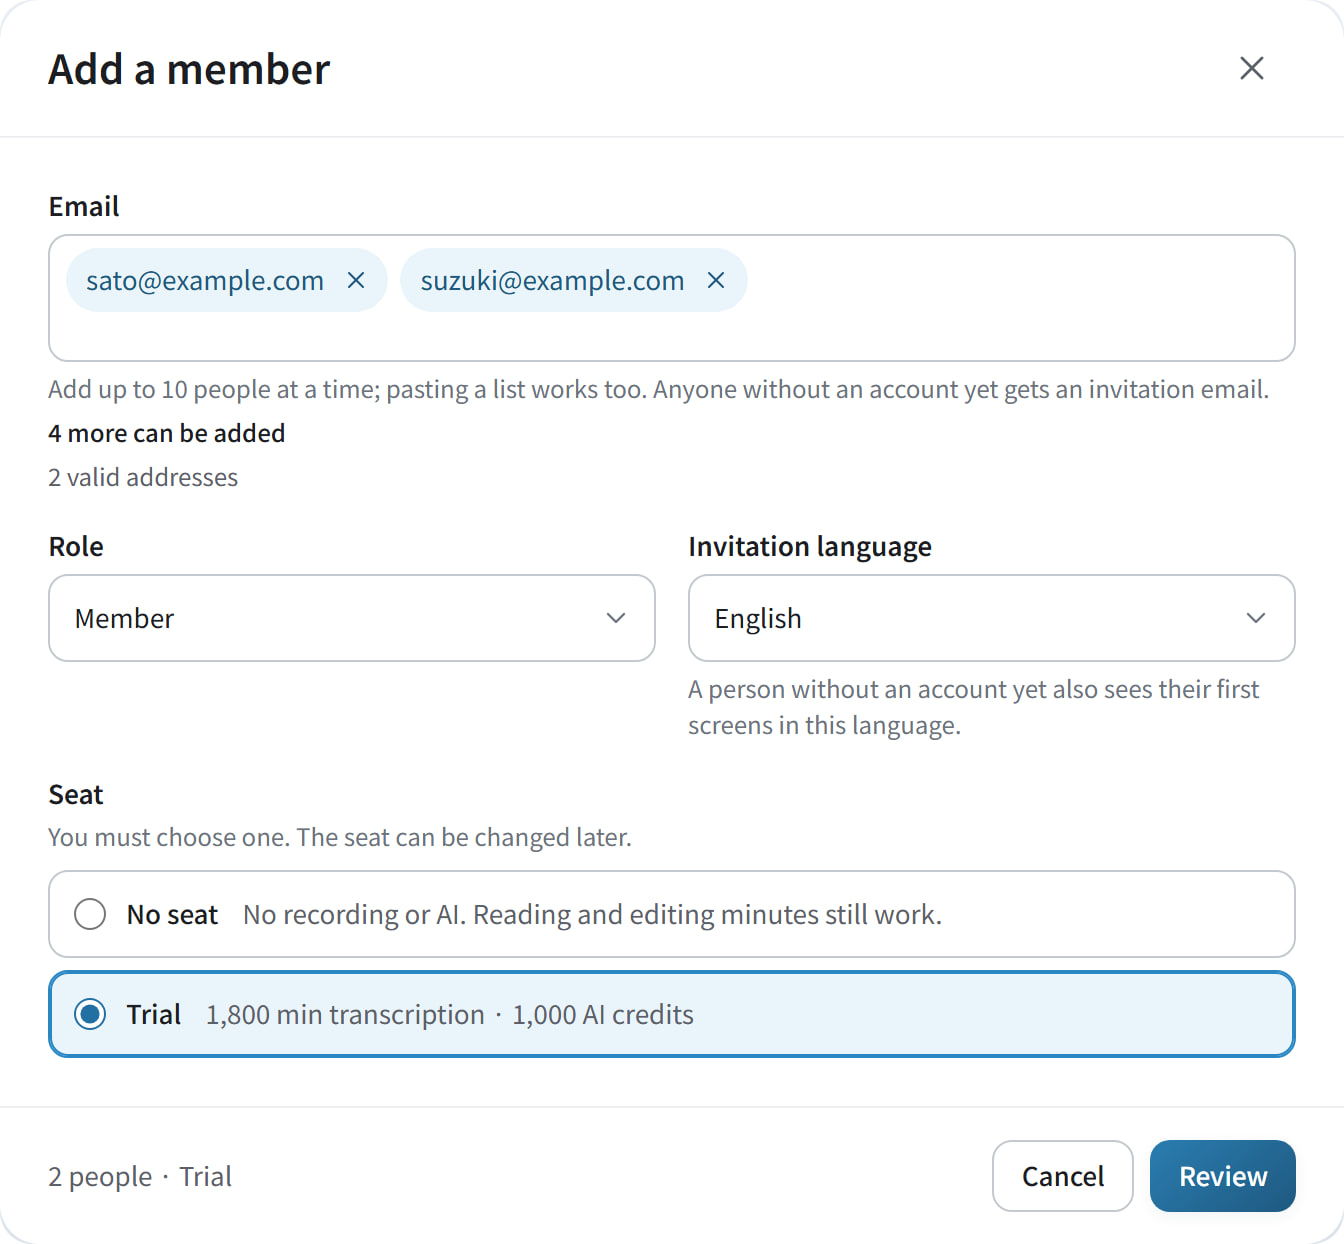
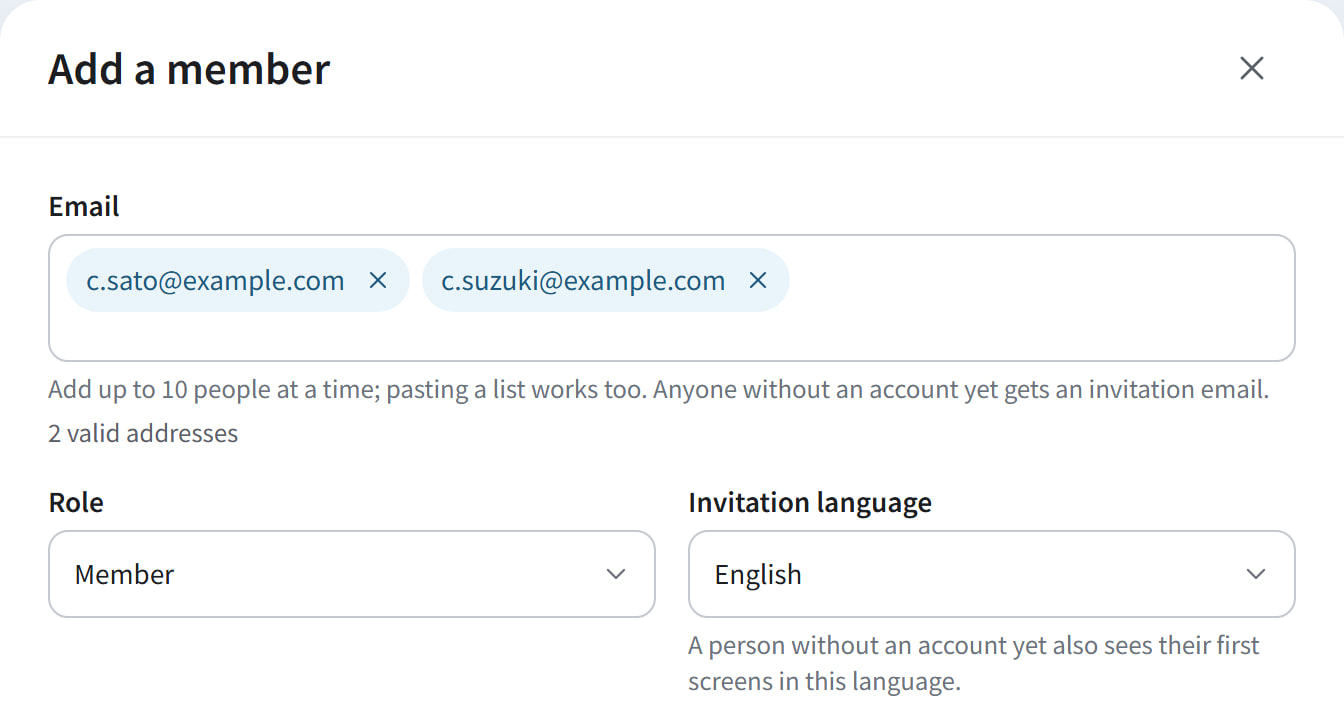
Enter email addresses
Separate them with commas or new lines. You can add up to 10 people at a time; with an account limit, only as many as there is room for.
Choose a role
“Member” for everyday use. “Admin” for someone who also manages members and settings.
Check the “Invitation language”
Choose one seat
None is chosen at first. With “No seat”, a person can't record.Each seat shows its transcription time, AI credits and monthly price. With “No seat”, a person can't record.
Press “Review”
Check, then send the invitations
Check the people, roles and seats, then send. Anyone without an account gets an invitation email.
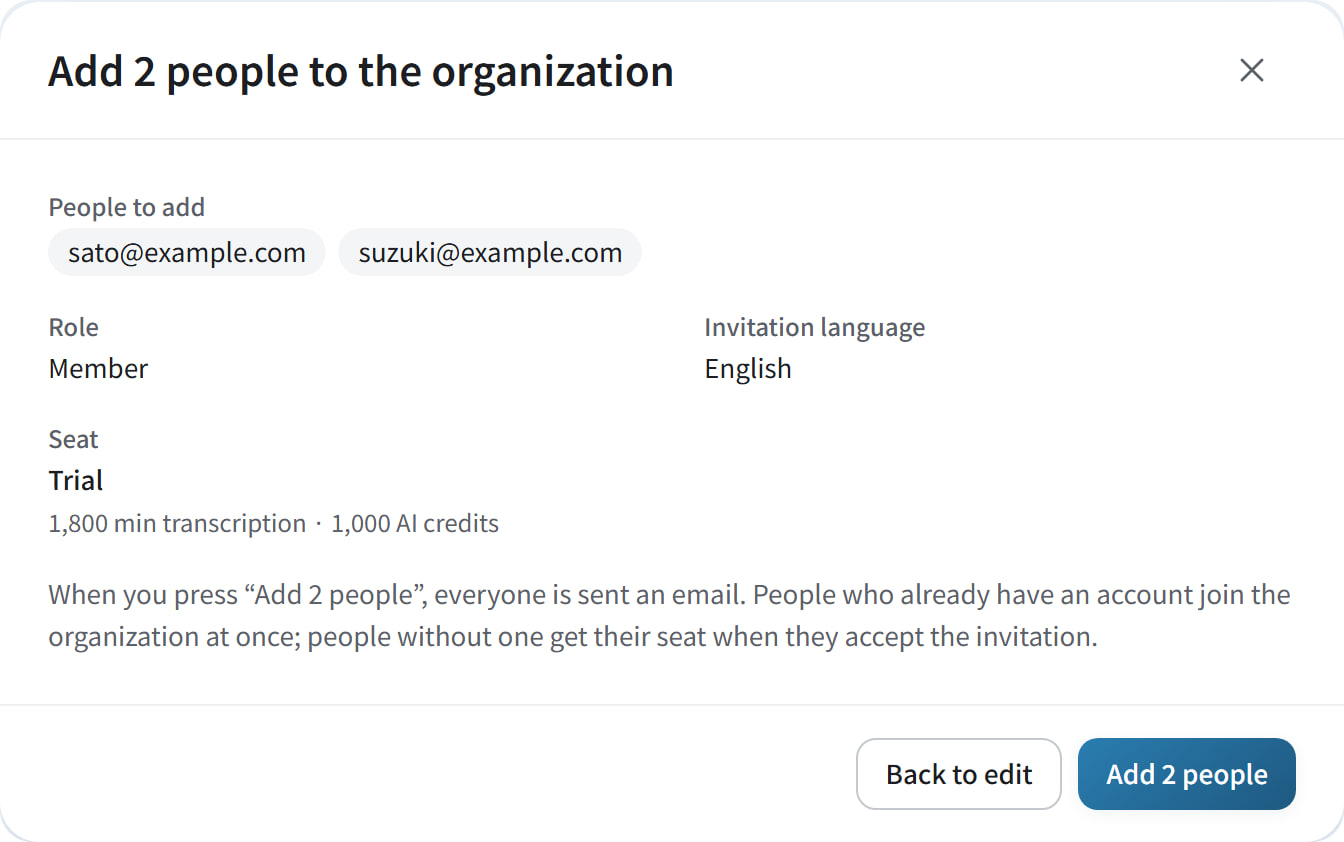
Press the button with the number of people
Press the button that shows how many, such as “Add 2 people”. Everyone gets an email.
Check, then press the button with the number of people
In the window that opens, check the people, roles, seats and the “Seat total”. Then press the button that shows how many, such as “Add 2 people”. Everyone gets an email.
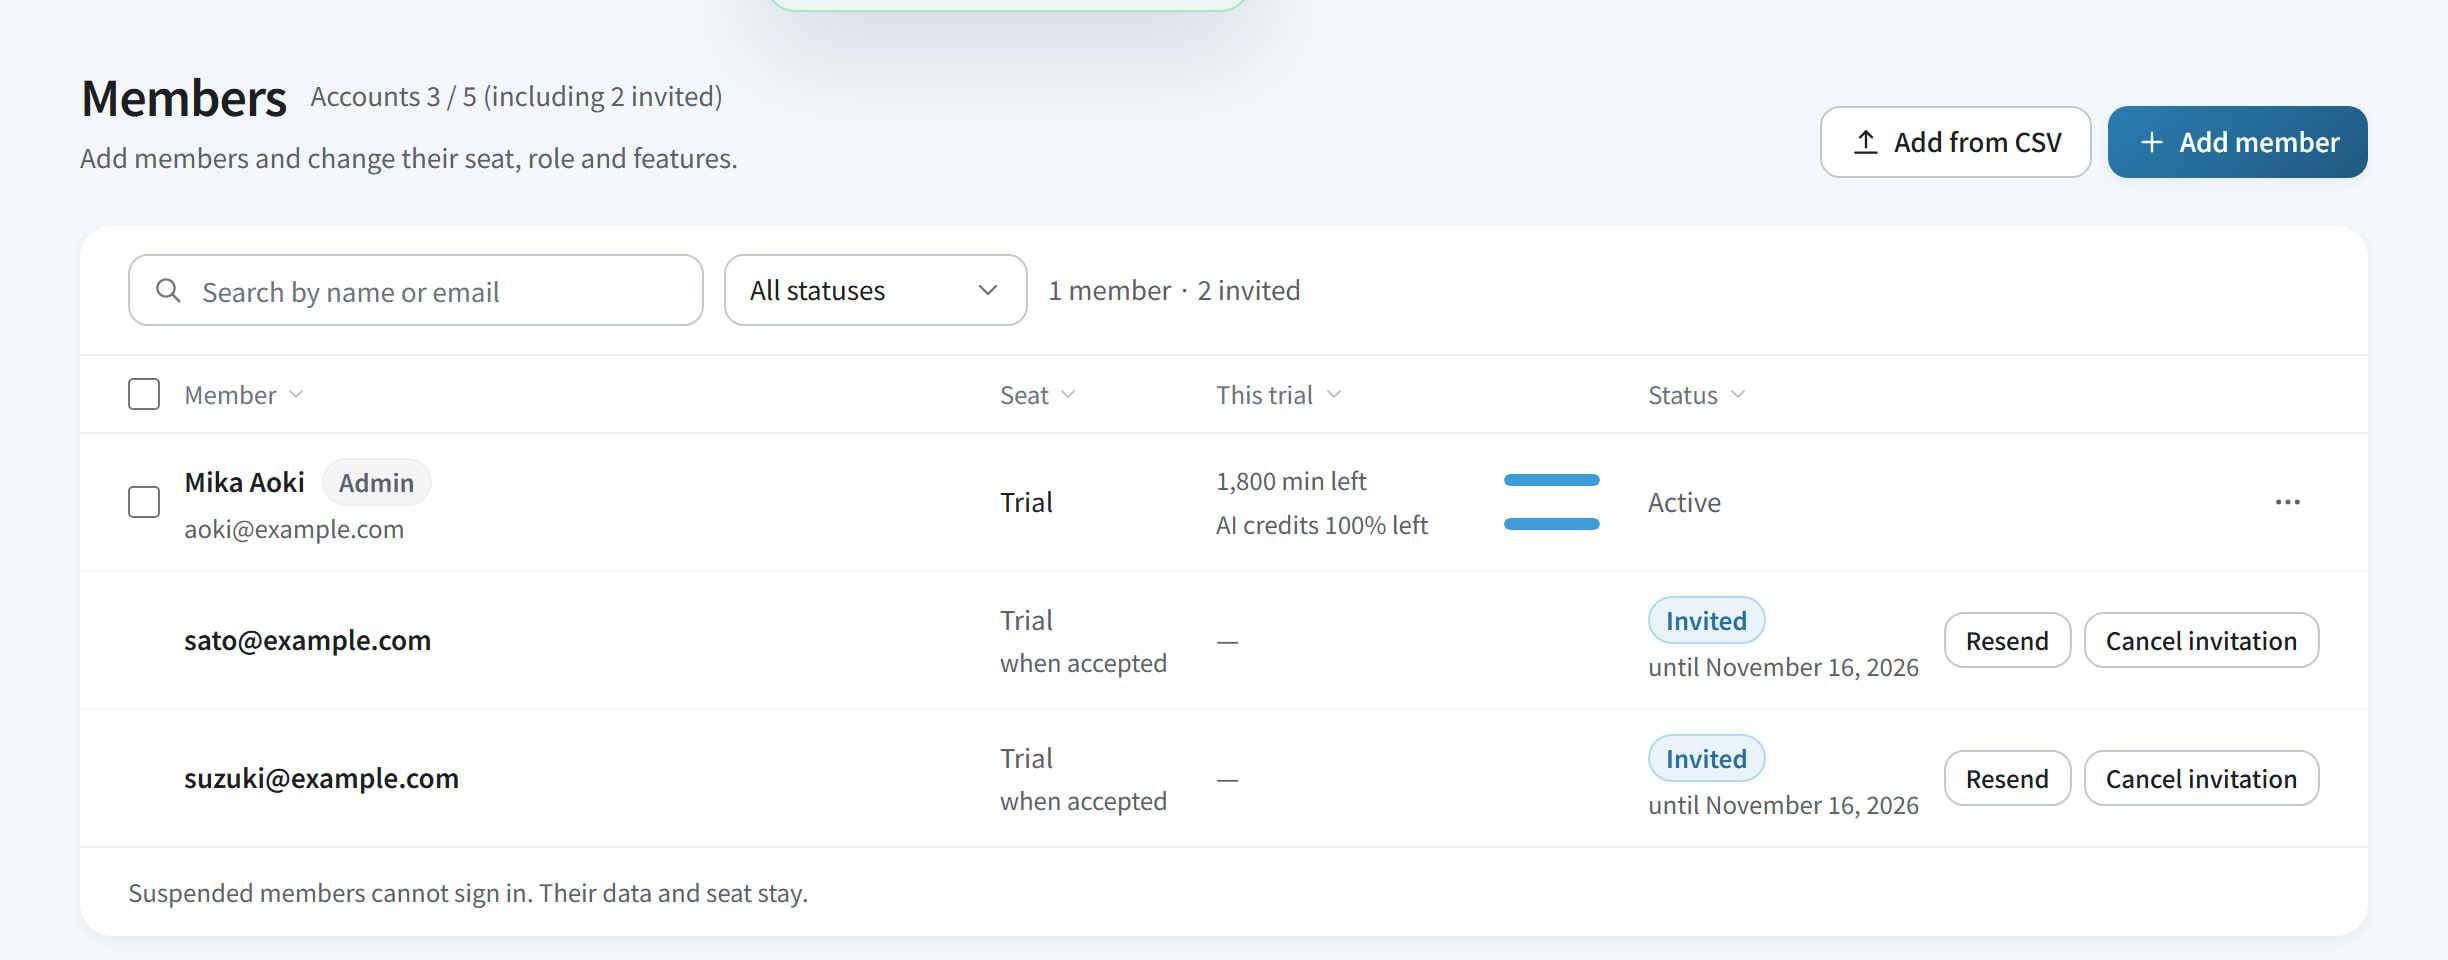
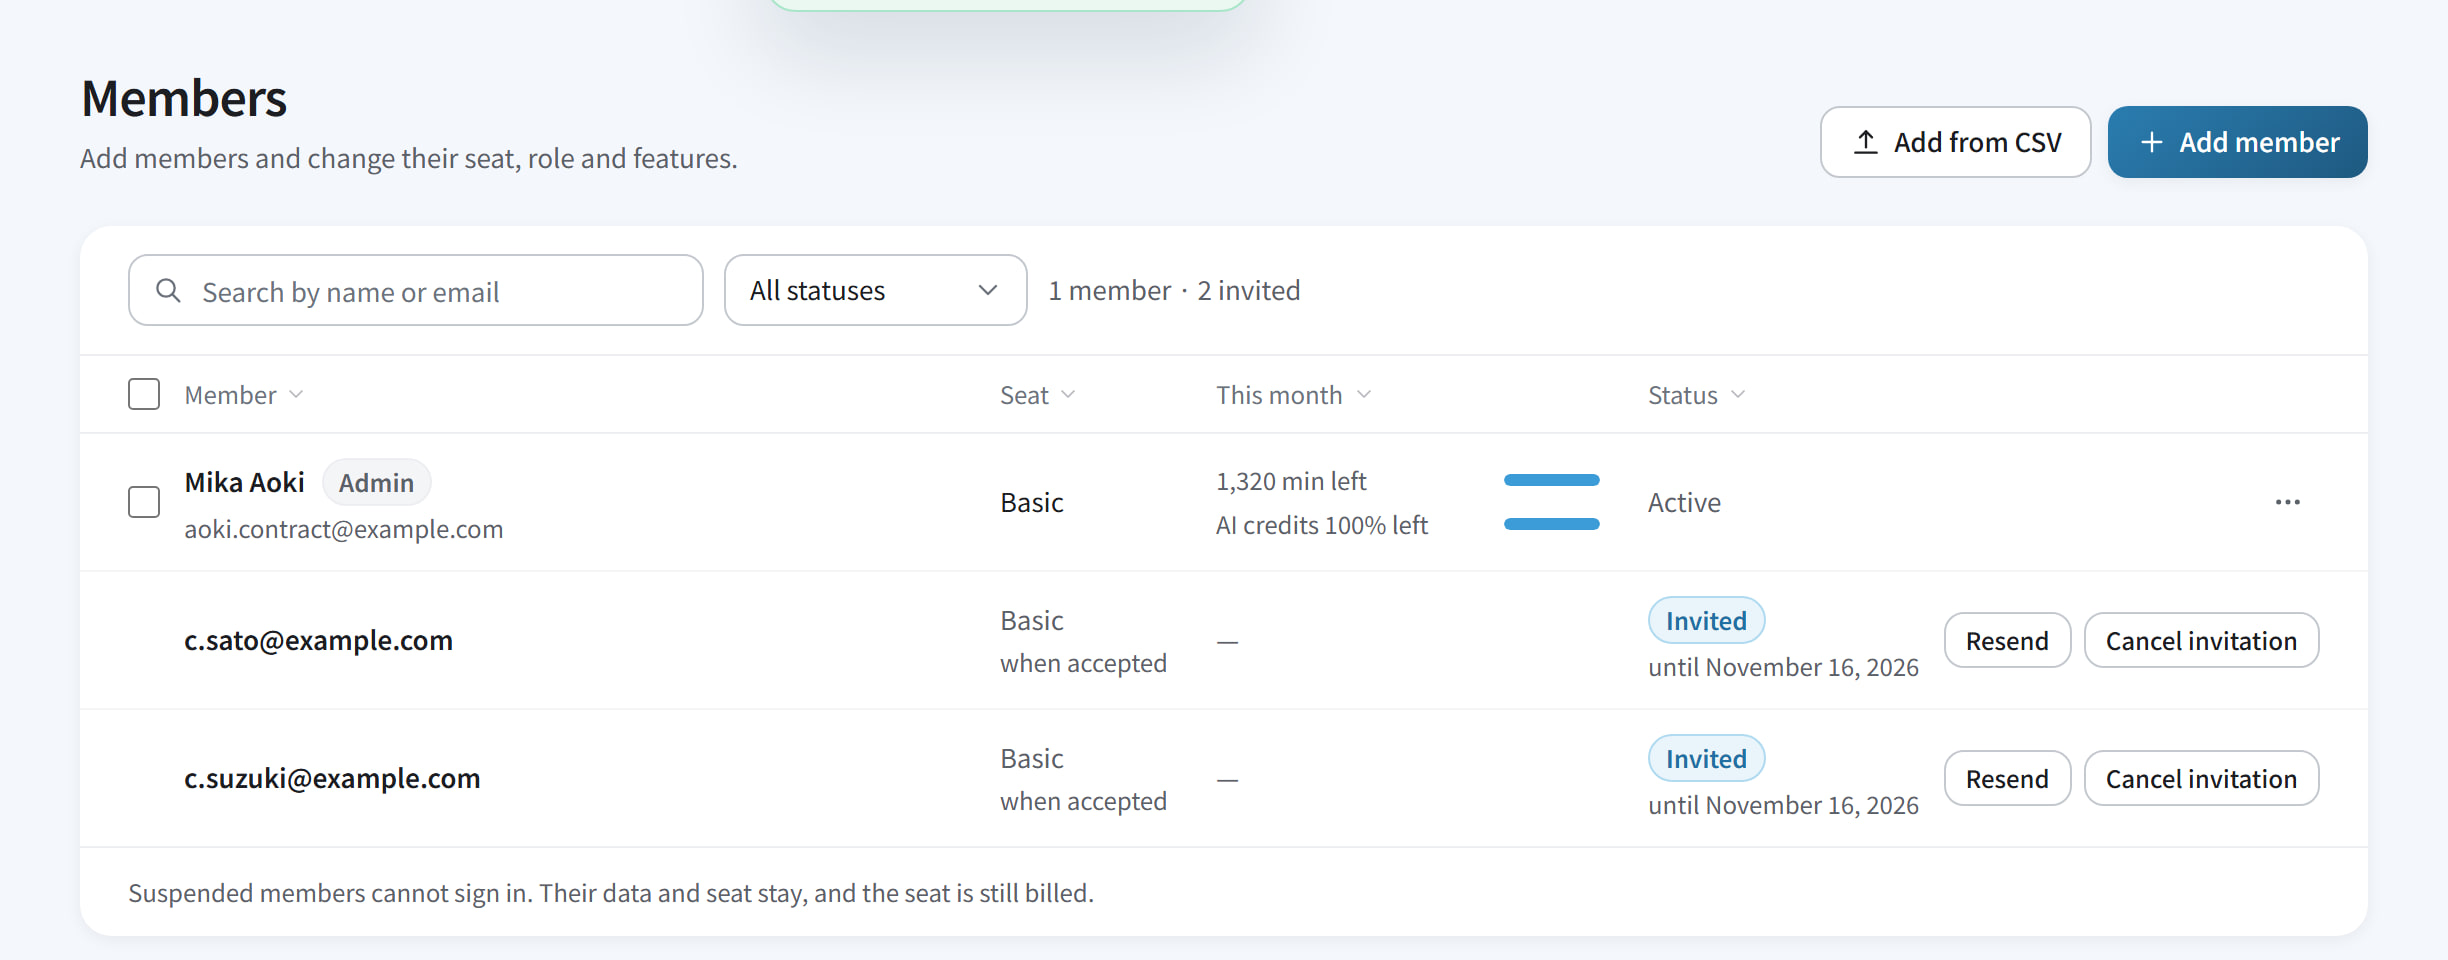
Check the number of accounts
It shows how many are in use and the limit. People still invited are counted too.
Check “Invited”
An invitation is valid for 7 days after it is sent. When someone accepts, they become a member with the seat you chose.
If the email doesn't arrive, press “Resend”
The old link stops working and a new invitation email is sent. You can also resend an expired invitation. To withdraw one, press “Cancel invitation”.
Good to know
Account limit and seats
The account limit decides how many people can use GIJITO. A seat decides how much one person can use.
Account limit
The count is the people who have joined plus the open invitations. Suspended people count; expired invitations don't. At the limit, the message below appears and you can't add more members.
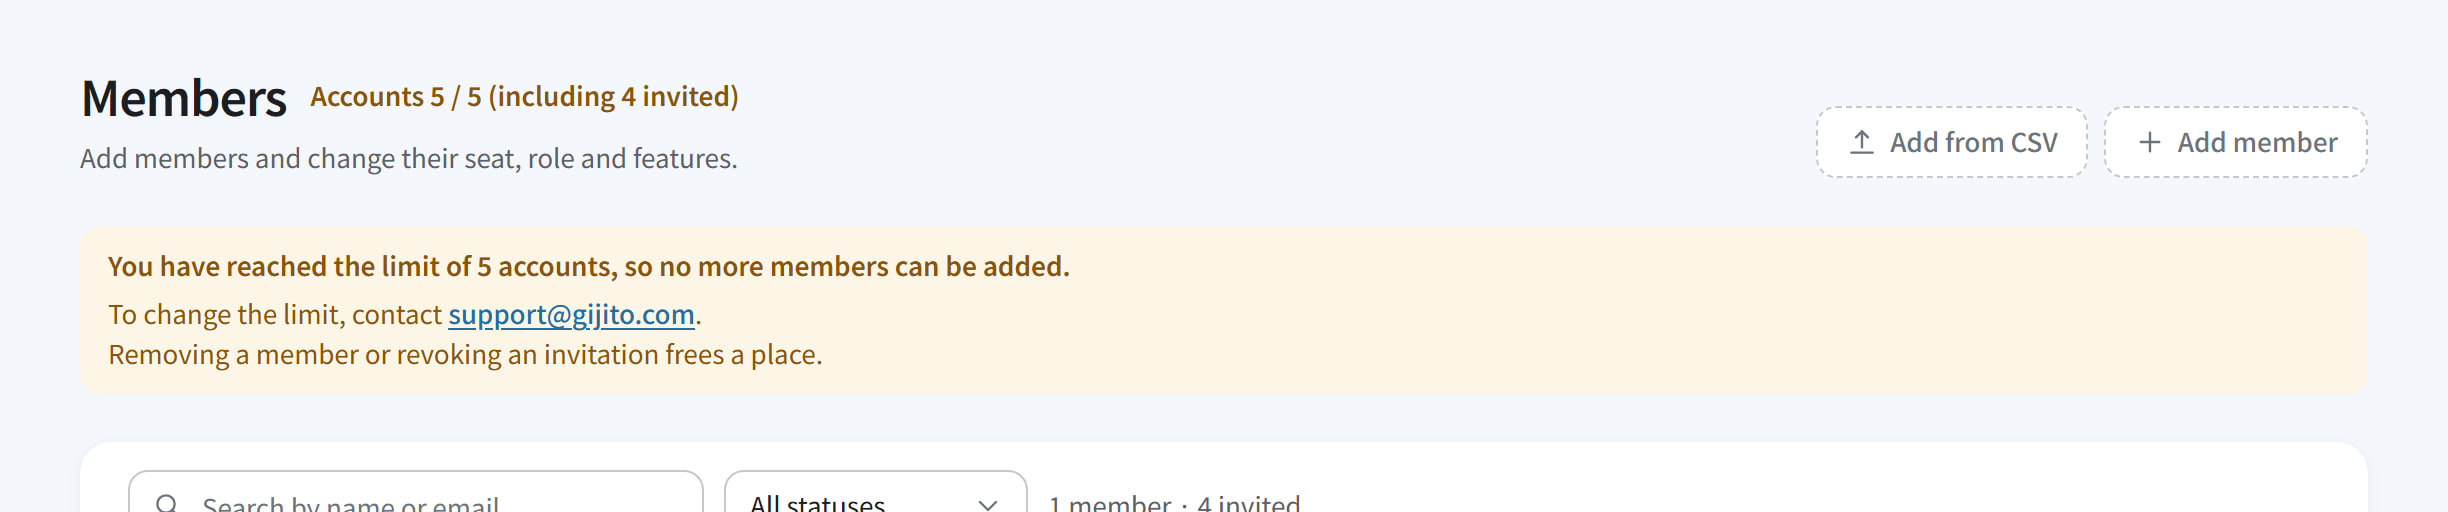
What a seat lets you do
| With a seat | No seat | |
|---|---|---|
| Record | Yes | No |
| AI features (creating minutes and more) | Yes | No |
| Read and edit minutes | Yes | Yes |
You can change someone's seat after adding them. Press a name in the “Members” list to open that person's details.
How much you can use during the trial
Each seat's transcription time and AI credits are for the whole trial period. They don't refill when a new month starts.

What you have left is shown on “Meetings”. For each member, see “This trial” in the “Members” list.
When transcription time runs out
You can't start a new recording. A recording already running can go on for up to 60 minutes.
When AI credits run out
Anything that uses AI, such as creating or regenerating minutes, stops. Recording and transcription still work.
To raise the limit or add time, an admin can contact support@gijito.com.
Good to know
Seats and monthly allowance
A seat decides how much one person can use. Anyone who records needs a seat.
What a seat lets you do
| With a seat | No seat | |
|---|---|---|
| Record | Yes | No |
| AI features (creating minutes and more) | Yes | No |
| Read and edit minutes | Yes | Yes |
Monthly allowance
Each seat comes with set amounts of transcription time and AI credits for each month. In the month you add a seat, the amounts depend on how many days are left.

What you have left is shown on “Meetings”. For each member, see “This month” in the “Members” list.
When transcription time runs out
You can't start a new recording. A recording already running can go on for up to 60 minutes.
When AI credits run out
Anything that uses AI, such as creating or regenerating minutes, stops. Recording and transcription still work.
About seat charges
- The seat charges in “Usage” are an estimate from current seat prices, not a bill.
- Suspending a member keeps their seat, and its charge.
- To stop a charge, change the seat to “No seat”. This month's charge stays the same, and there is no charge from next month. Recording and AI features stop right away.
If your organization has an account limit, “Members” shows how many accounts are in use. To raise the limit or add time, an admin can contact support@gijito.com.
Part 2 · Your first meeting
Members follow the same steps
STEP 4
Record your first meeting
From here on, members do the same. While you record, what is said turns into text. This example is an online meeting.
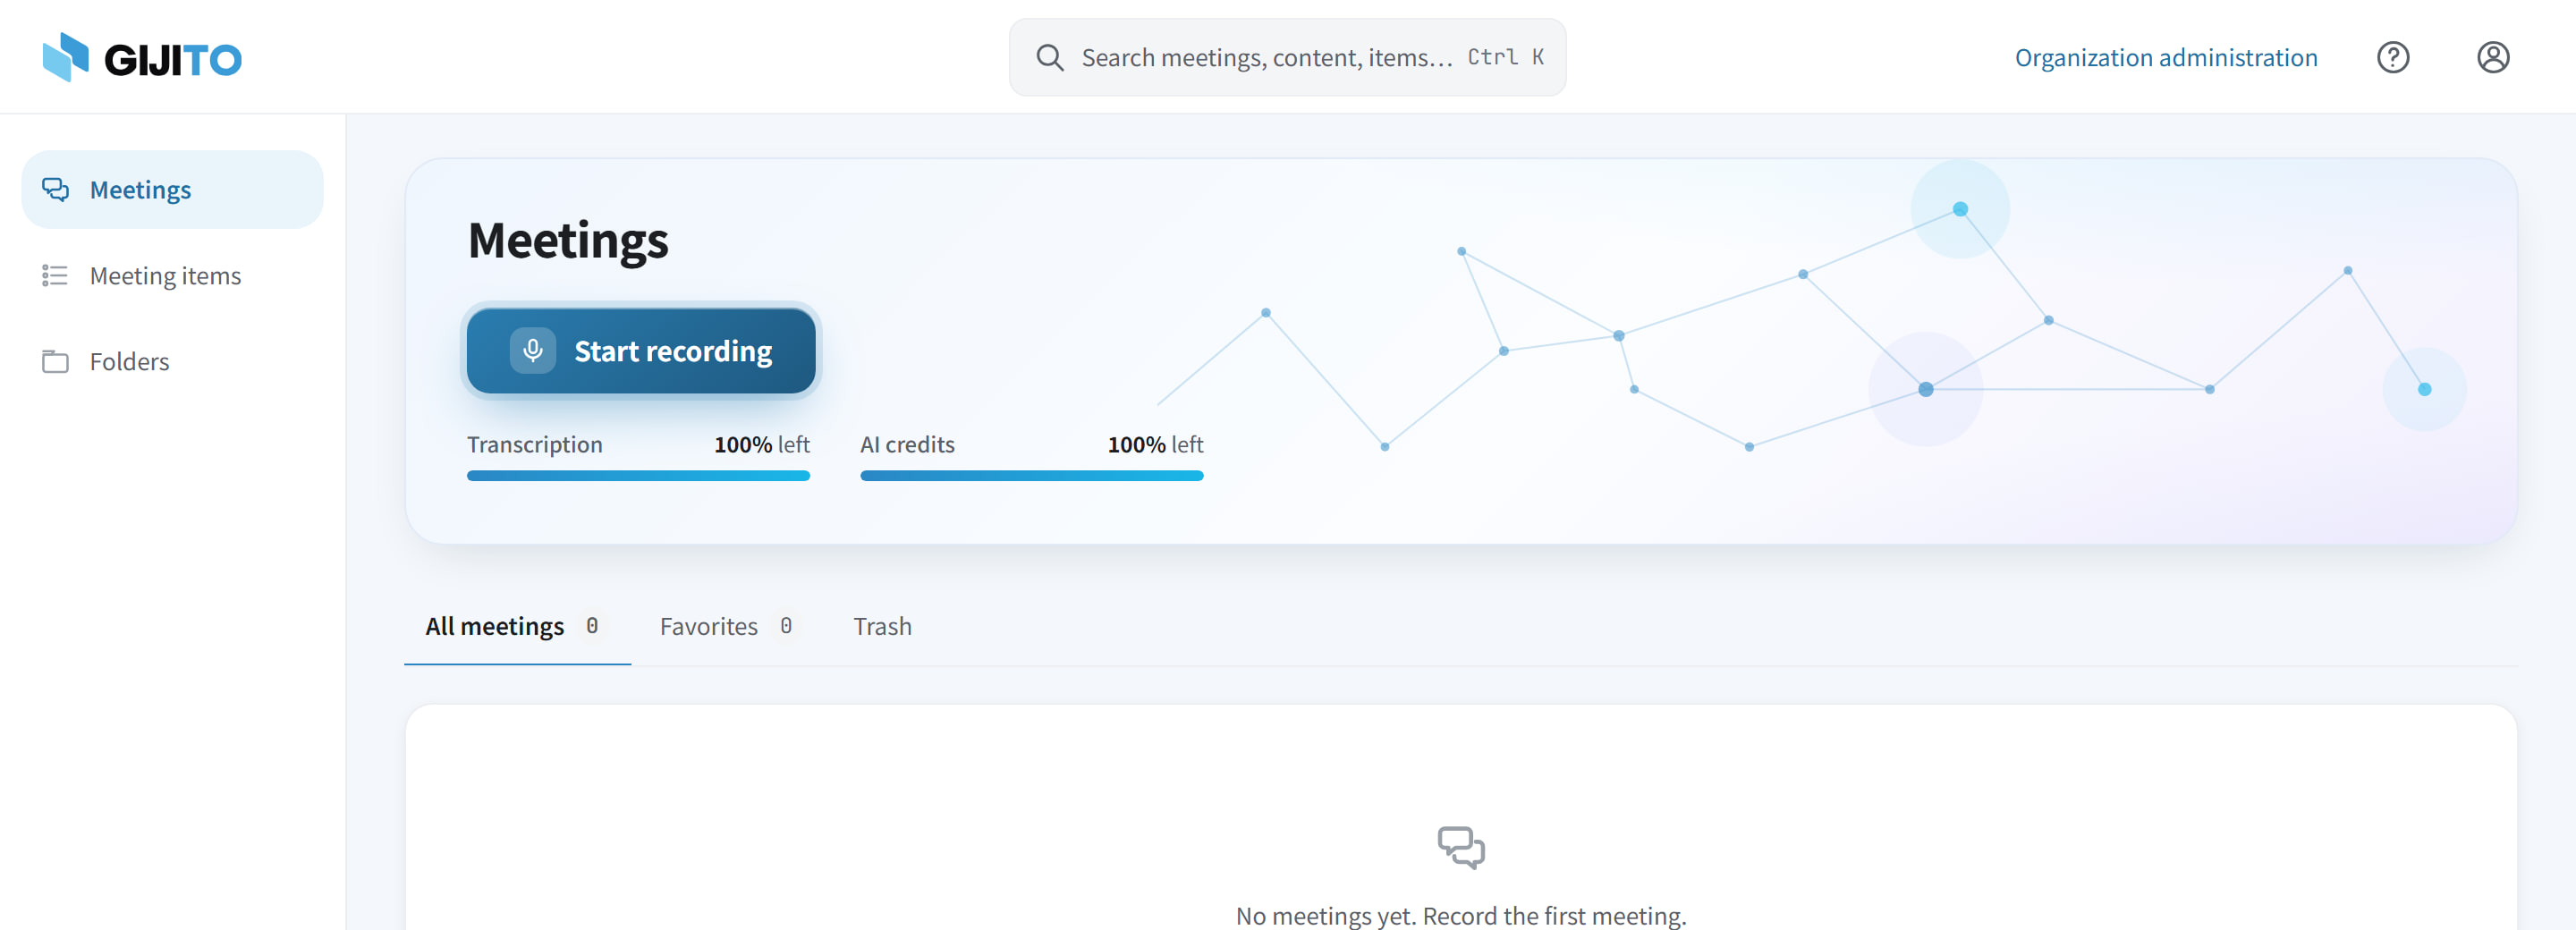
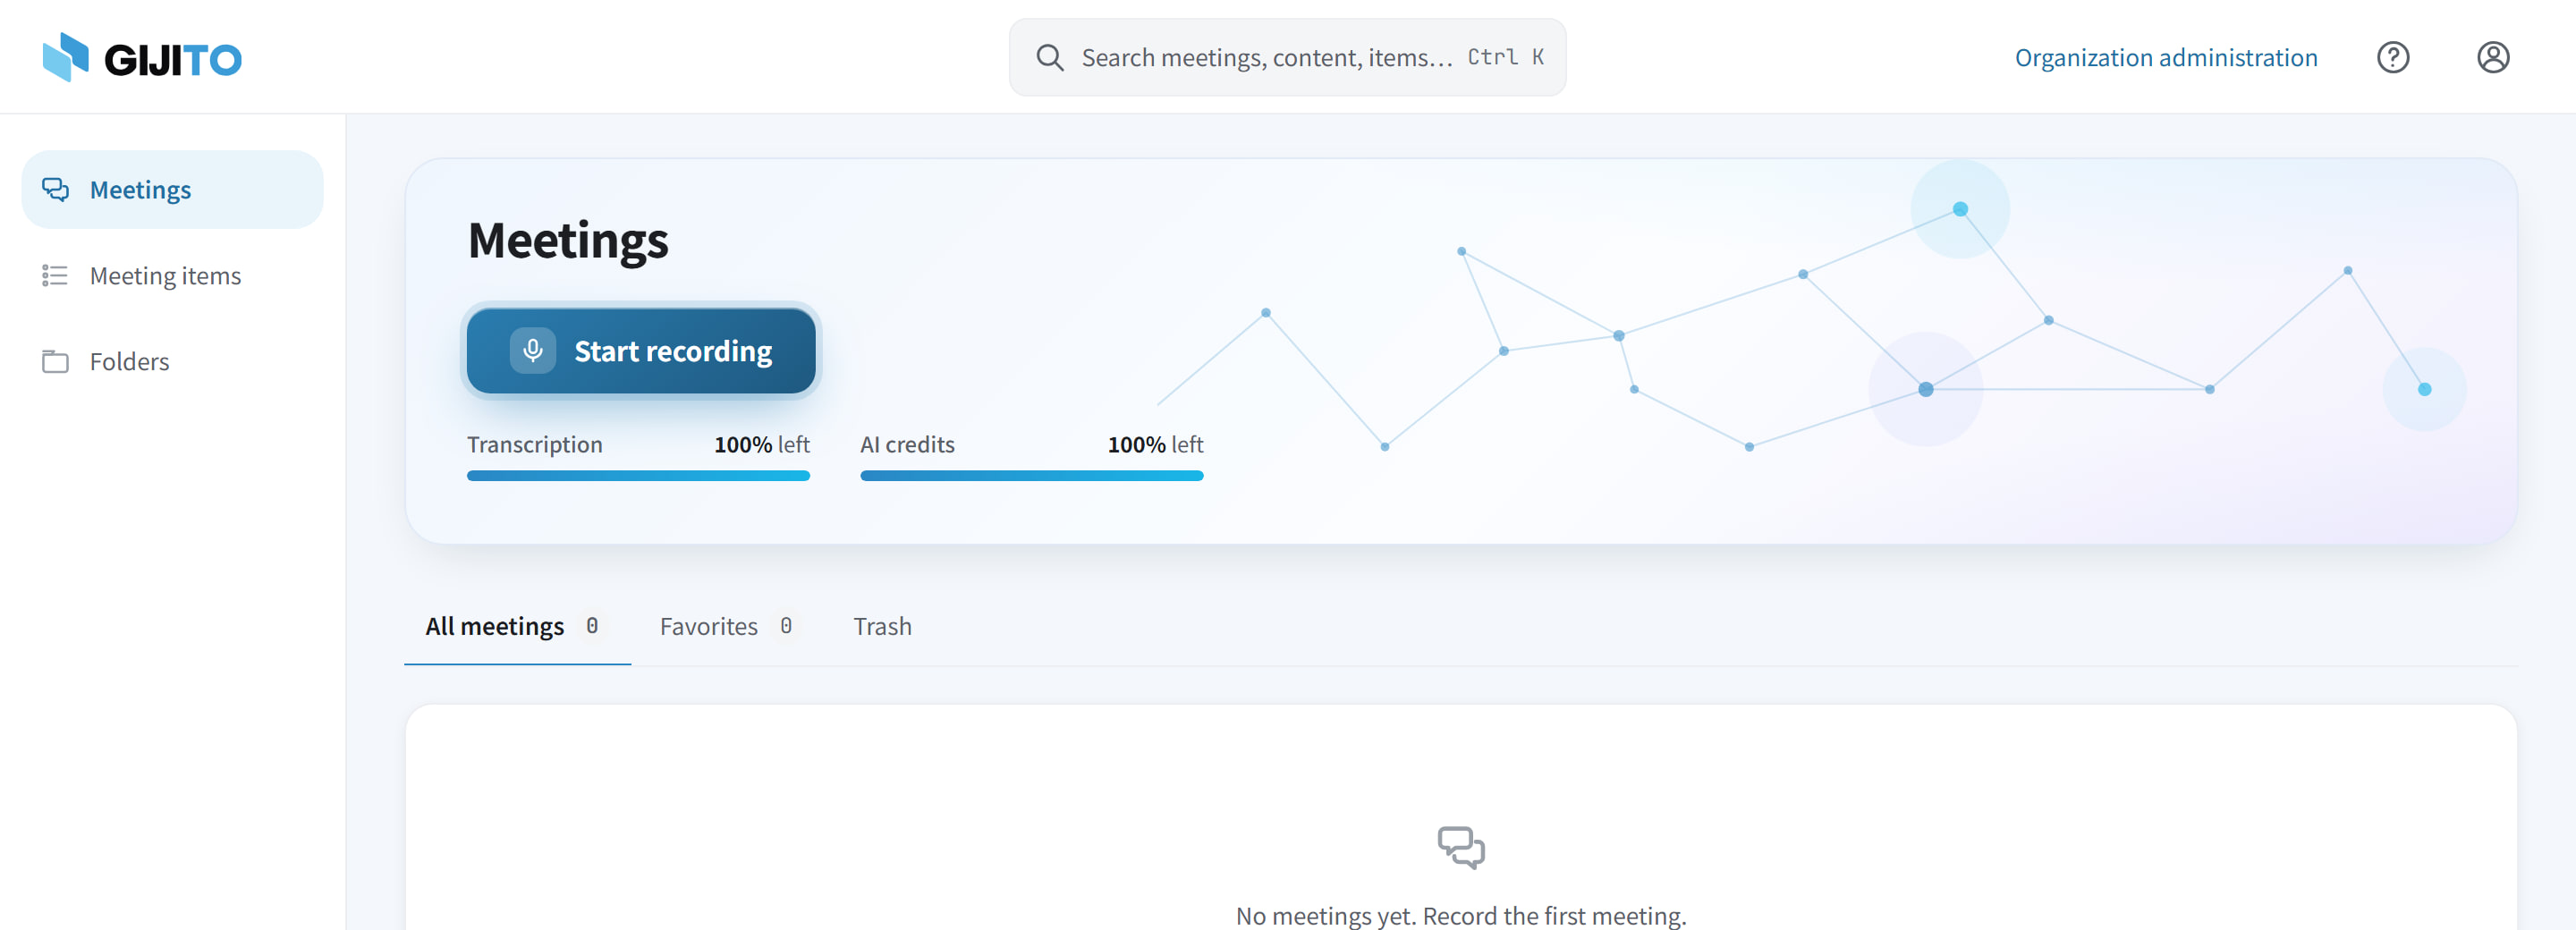
Press “Start recording”
It is on “Meetings”, which opens from the left menu.
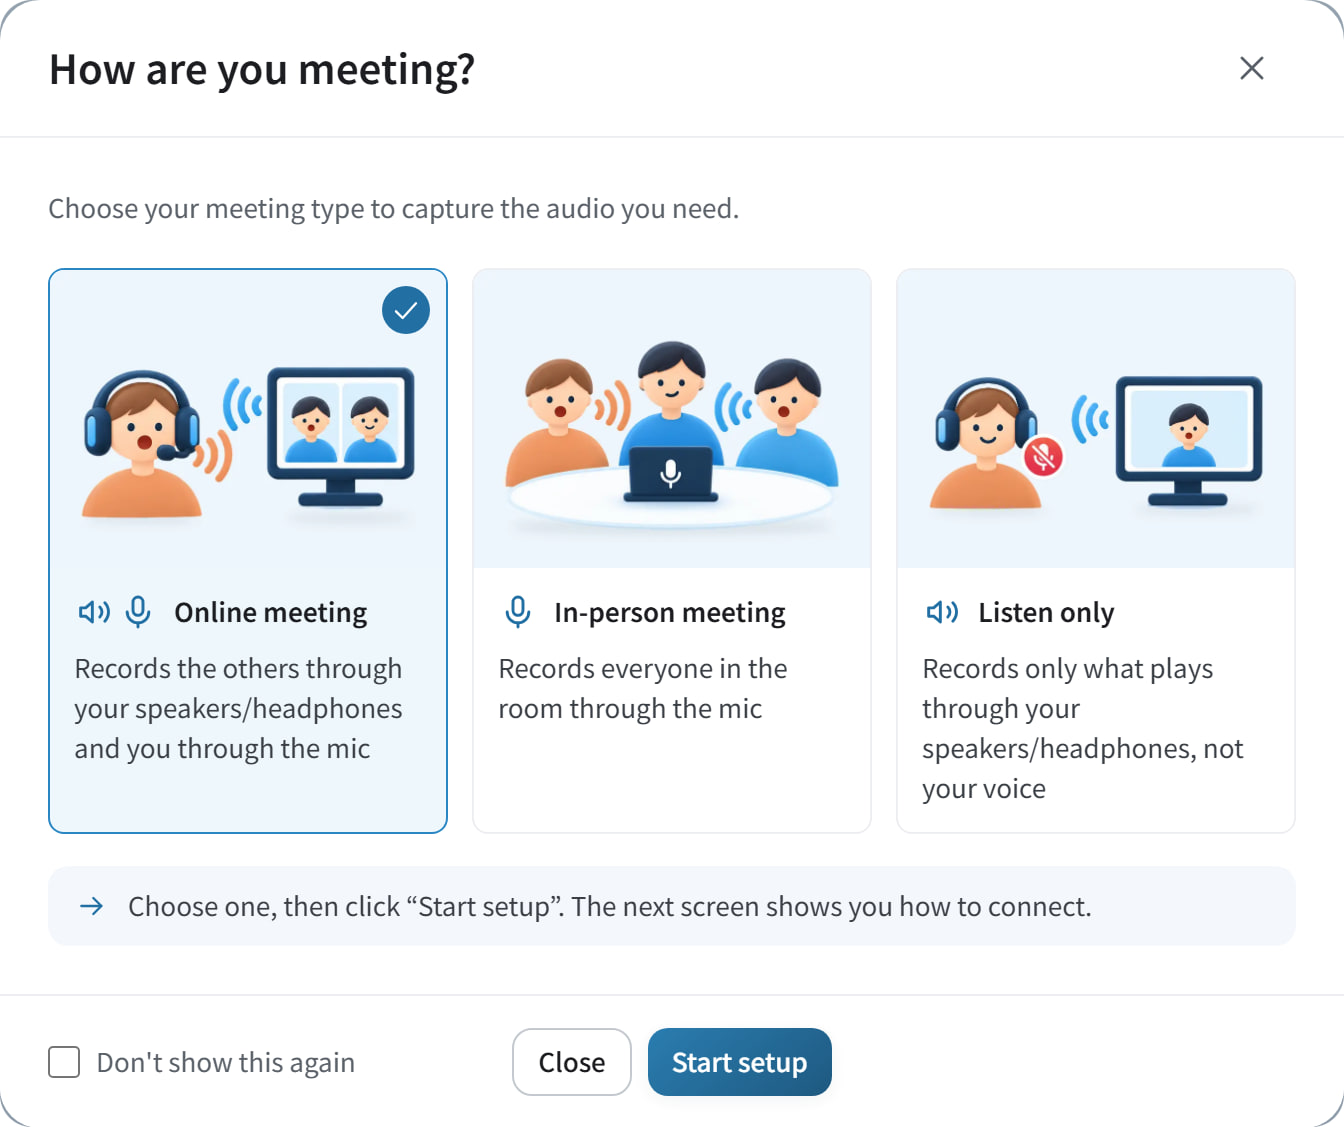
Choose the kind of meeting
To record the other people's voices and your own, choose “Online meeting”.
Press “Start setup”
Connect the meeting audio
The other people's voices are recorded as the sound your computer plays. GIJITO records sound only; it never records your screen.
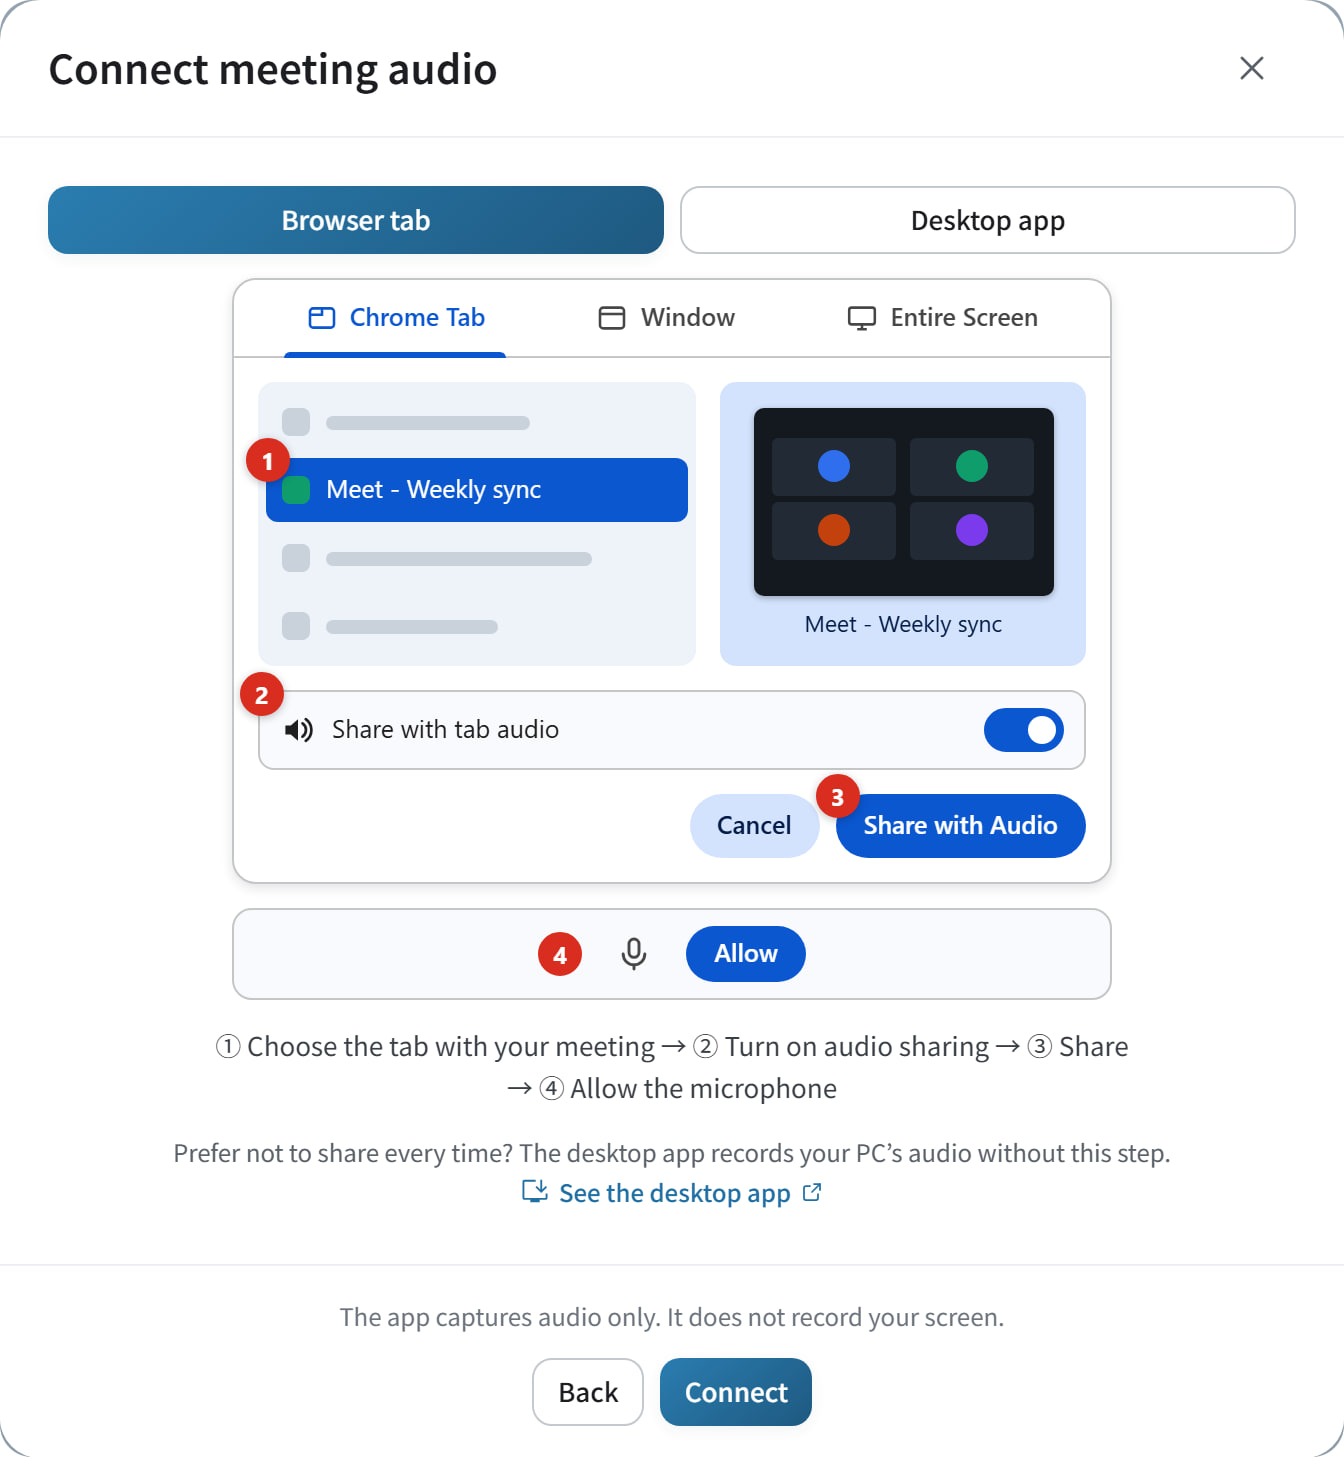
Choose where the meeting is open
“Browser tab” if it is open in your browser, “Desktop app” if it is open in the Zoom or Teams app.
Press “Connect”
Your browser opens a window to choose the tab (or window) to share.
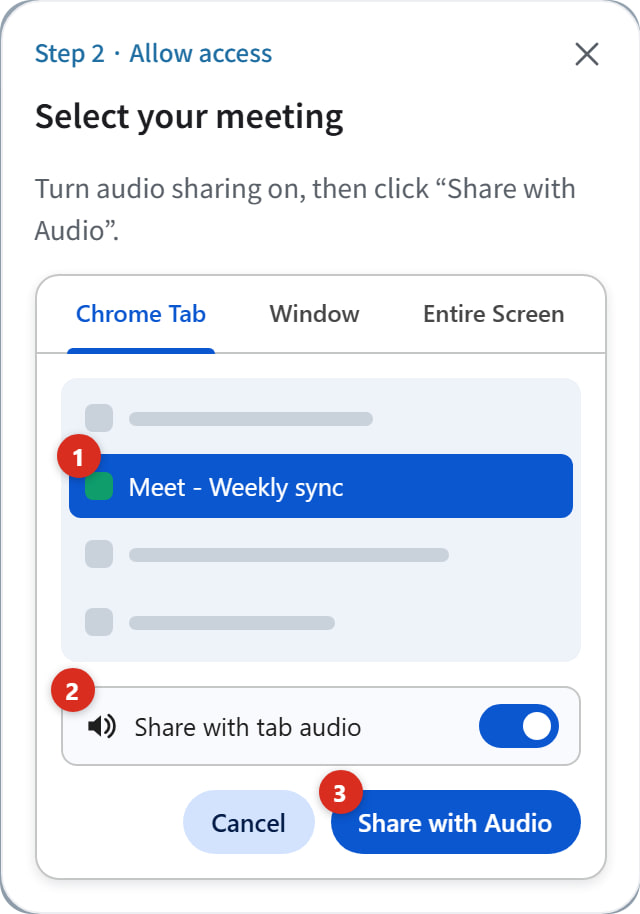
Choose the meeting's tab, and share it with audio
In Chrome, choose the meeting's tab, check that “Share with tab audio” is on, and press “Share with Audio”. For a desktop app, choose the meeting window and turn on “Share with system audio”. If sharing doesn't work, try joining the meeting in your browser.
Allow the microphone
When Chrome asks, press “Allow while visiting the site”. Once you allow it, you won't be asked again.
Start and stop recording
If what is said appears as text, the recording is working. Carry on with your meeting.
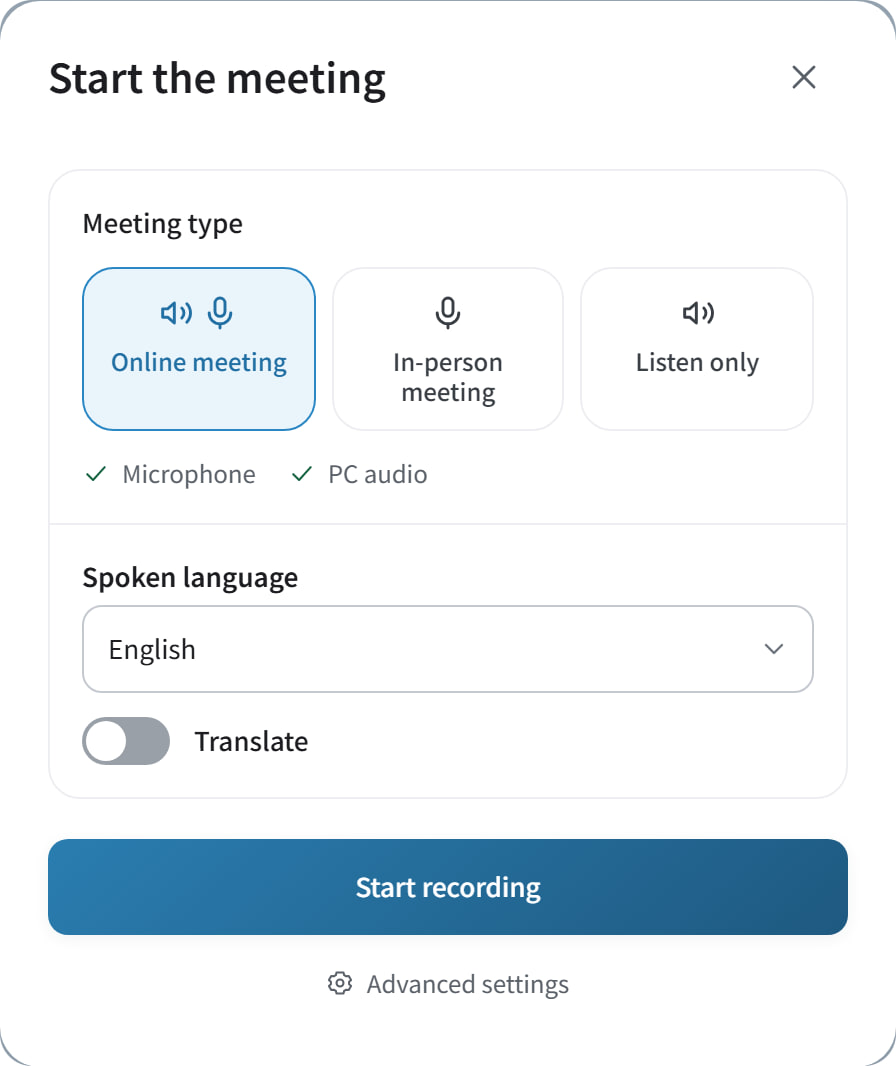
Check that what you connected has a ✓
For “Online meeting”, both “Microphone” and “PC audio”.
Check the “Spoken language”
Press “Start recording”
Recording starts, and the timer begins to run.
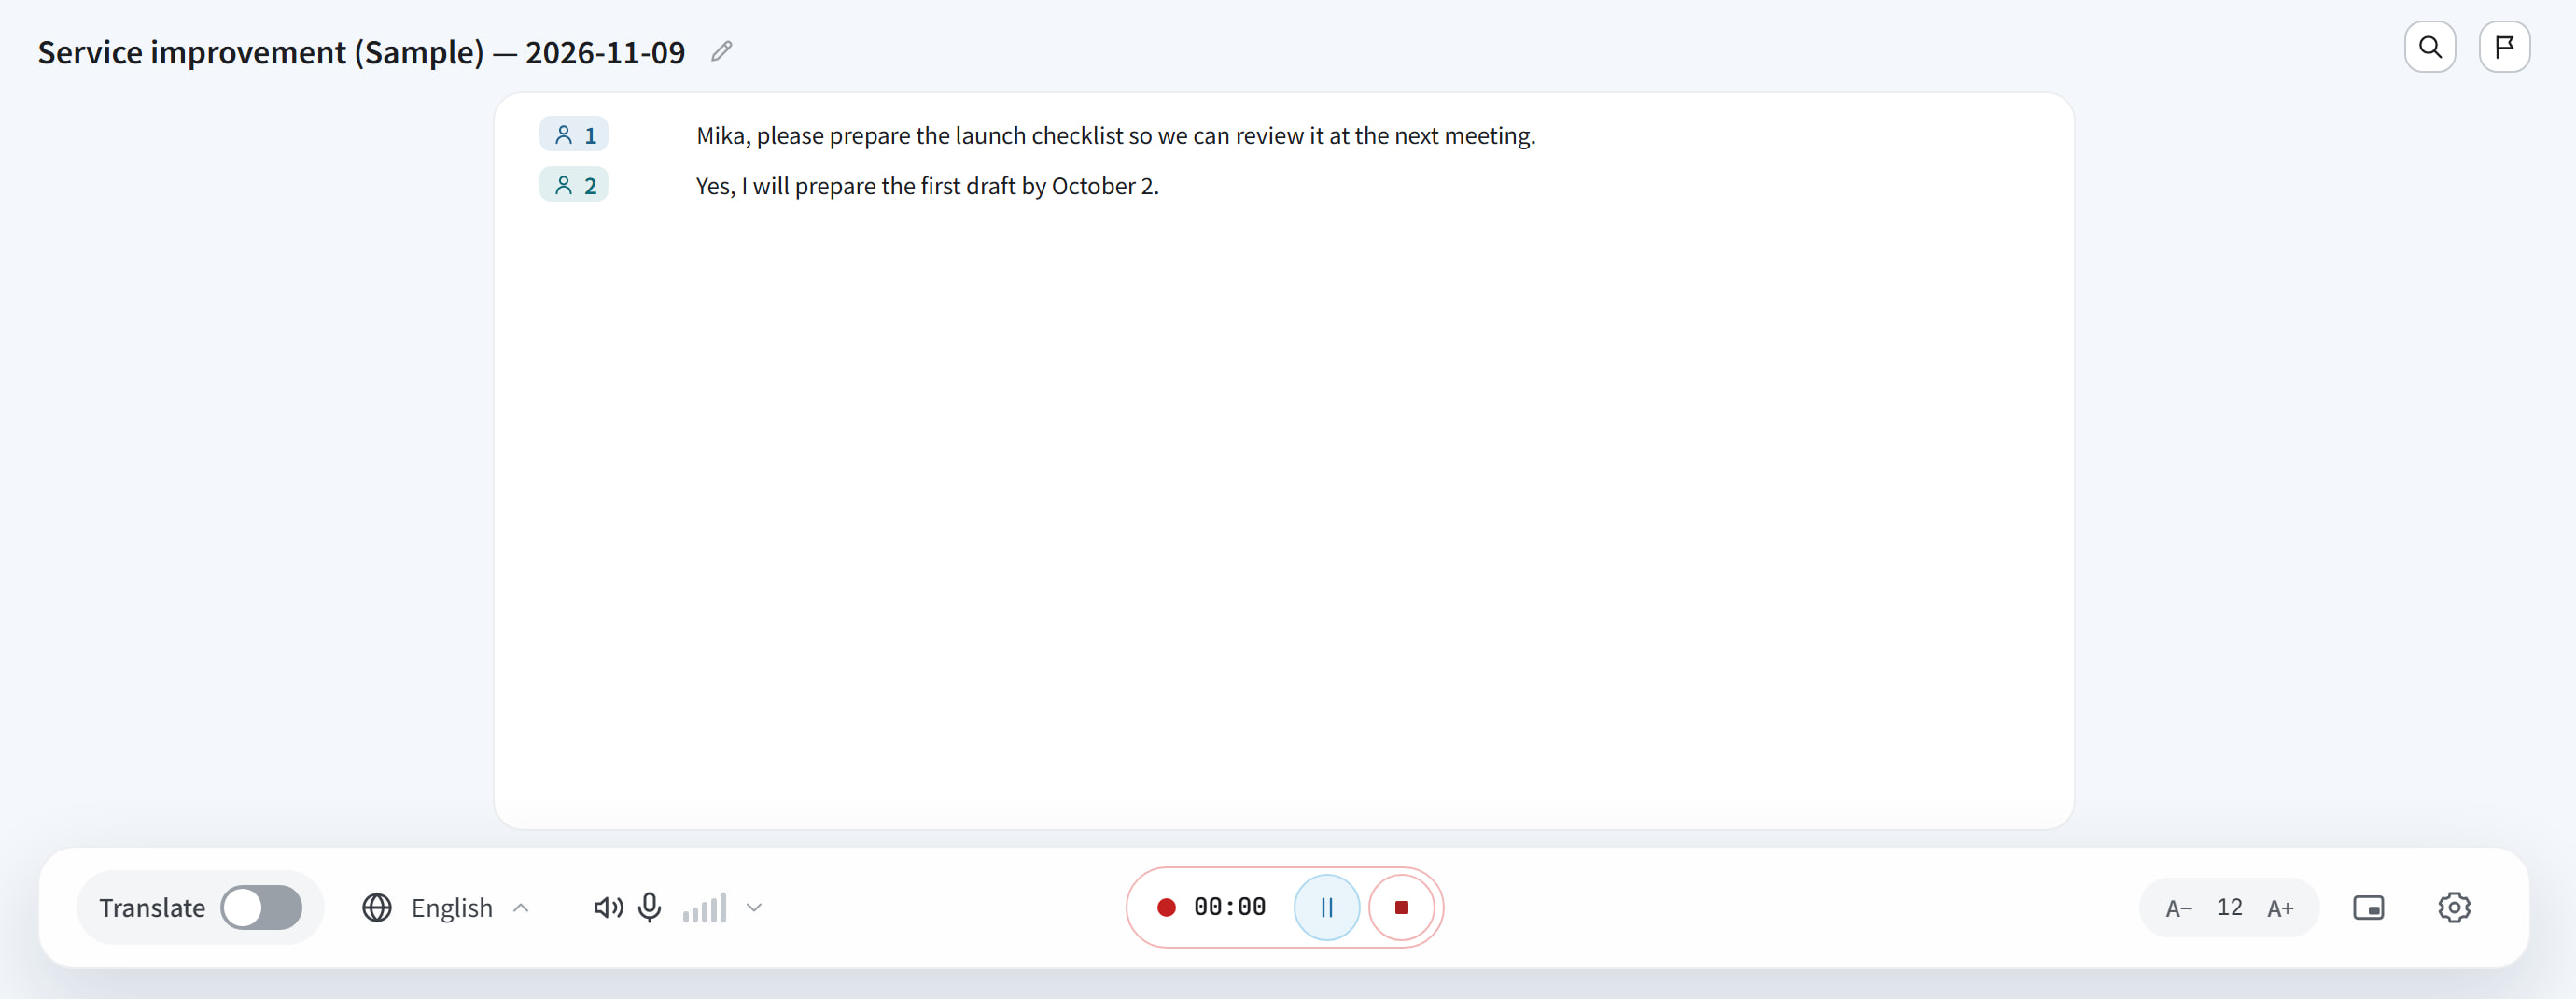
Check that both you and the others appear as text
If both sides appear, all is well. For a break, press “Pause” (the two bars).
When you finish, press the square “Stop”
Keep this screen open until the transcript has been saved.
STEP 5
Create and approve the minutes
Create the minutes
This screen opens when you stop recording. AI drafts the minutes from the text of what was said, the transcript.
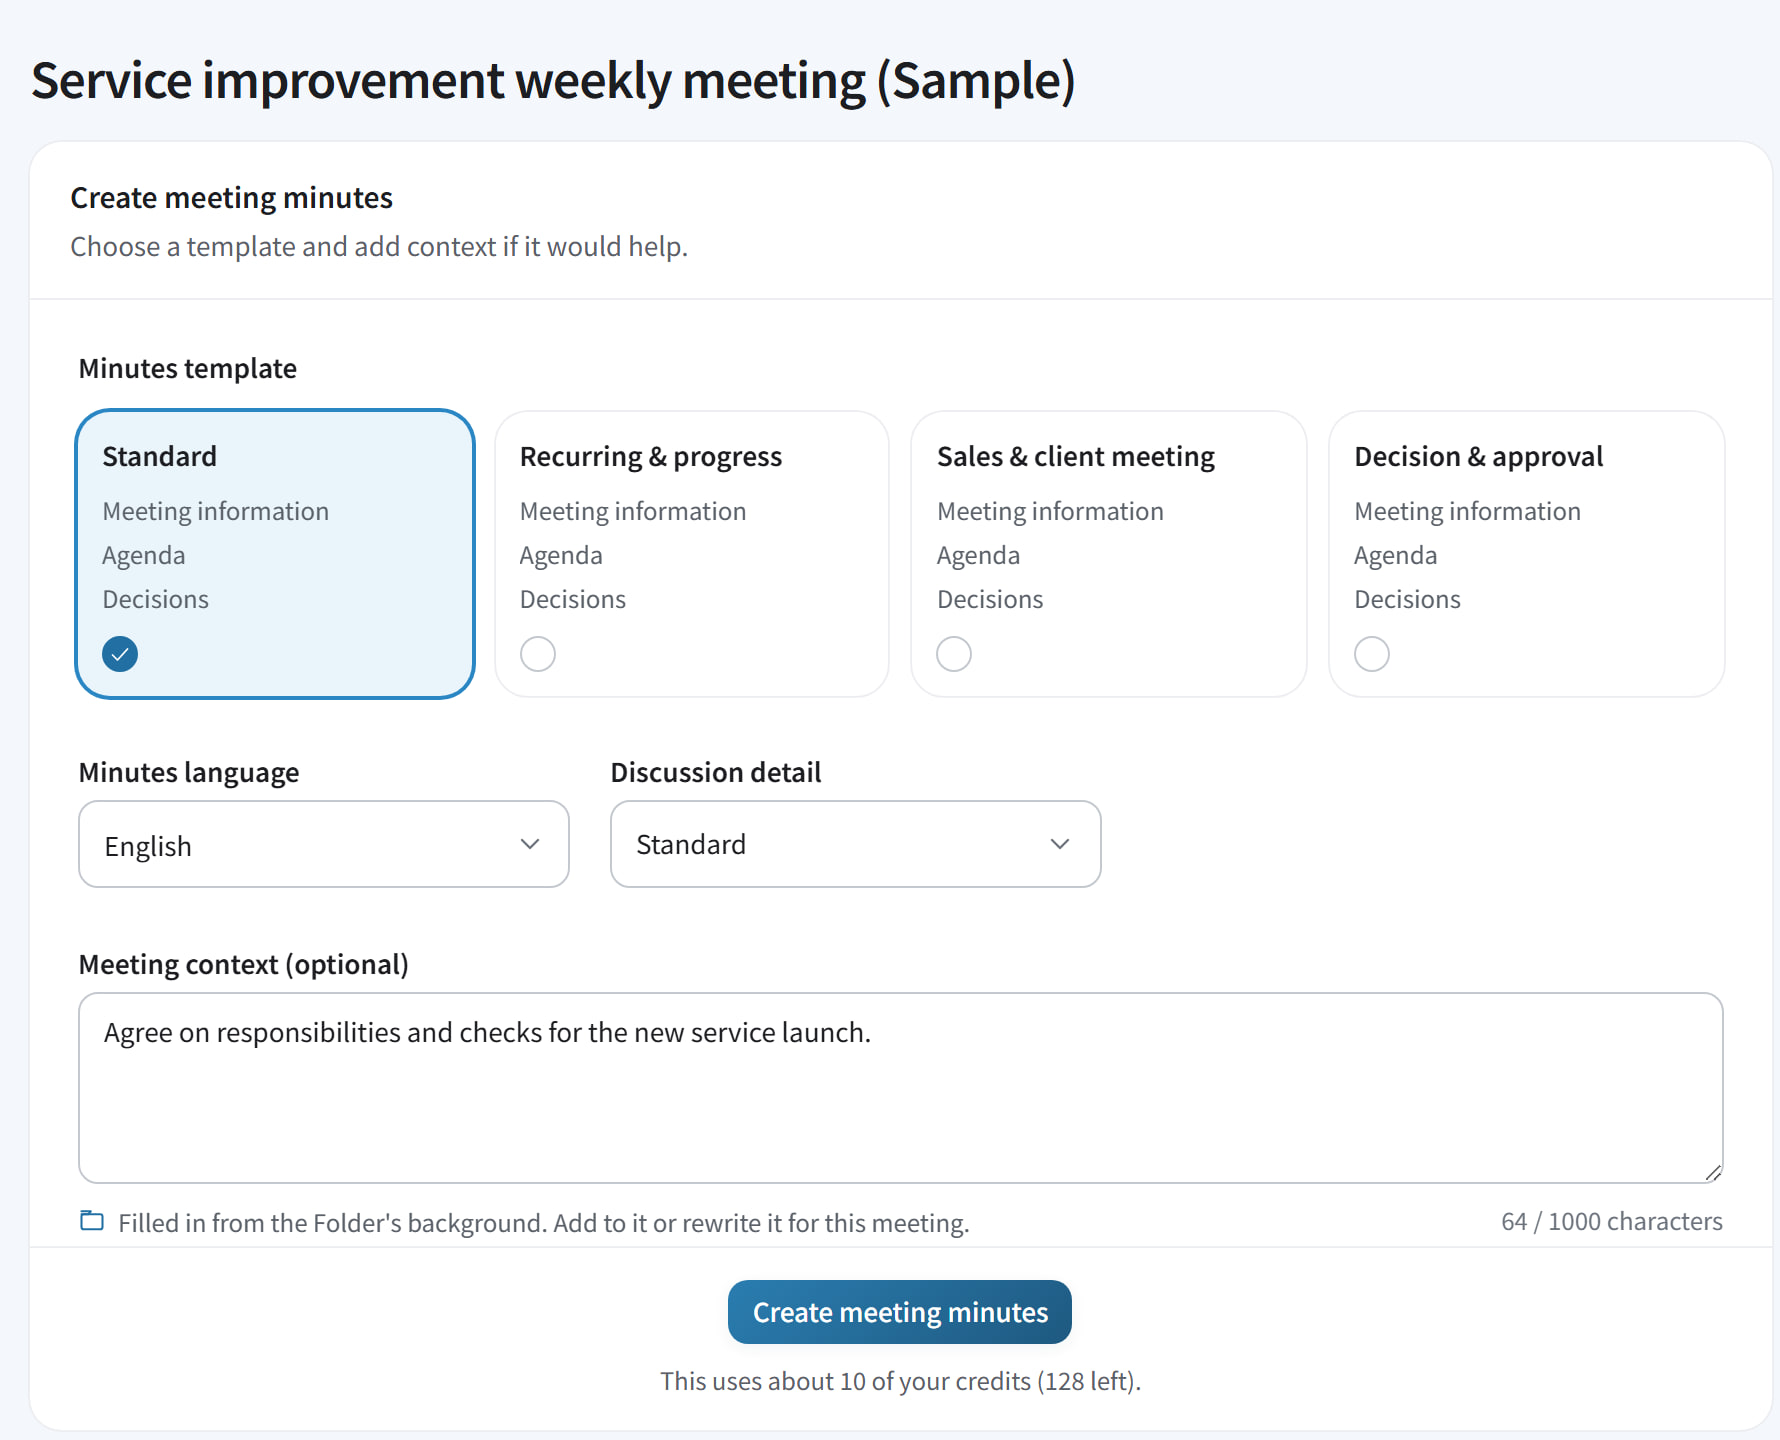
Check the template
One is already chosen. Pick another only if you want a different layout.
Check “Minutes language” and “Discussion detail”
For the detail, “Standard” keeps the main points; “Detailed” also keeps opinions and reasons. Some templates don't show this setting.
Add to “Meeting context (optional)”
You can leave it empty. The project name, the other company, who attended and their roles, or terms that come up often all make the minutes more accurate.
Press “Create meeting minutes”
Once it starts, you can leave this screen. When “Your minutes are ready” appears, the draft opens. You can also open it later from “Meetings”.
Check and correct the draft
What AI makes is a draft. Check that each item's content, person and due date match what was actually said.
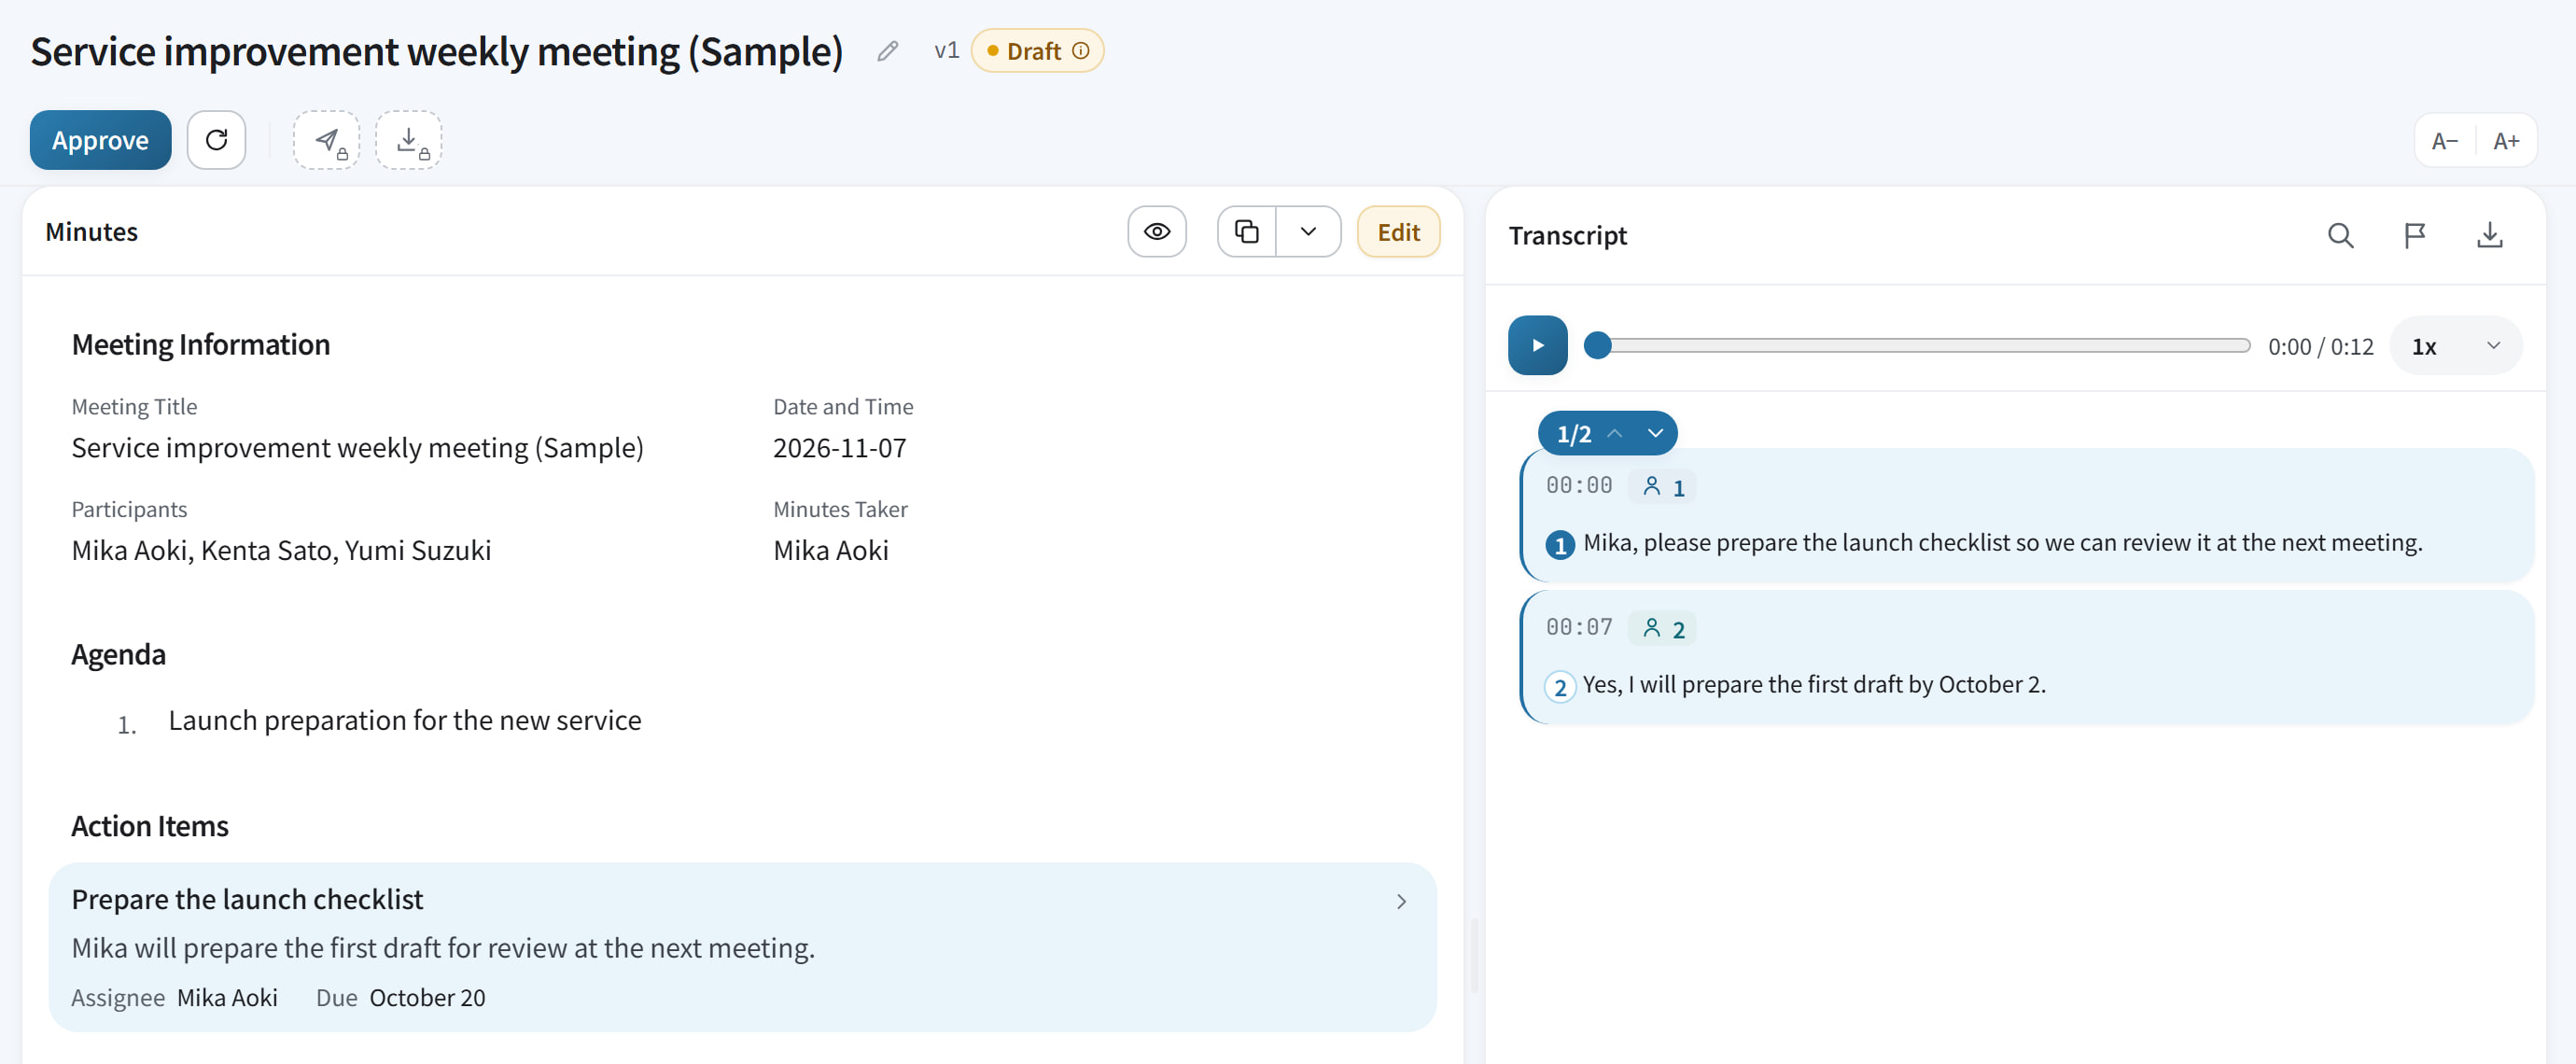
Press an item's title
Press the item you want to check.
Read what was said
In “Transcript” on the right, the lines it comes from are highlighted.
Use the arrows for the next source
They appear when an item comes from more than one place.
If something is wrong, press “Edit”
The minutes switch to a view you can change.
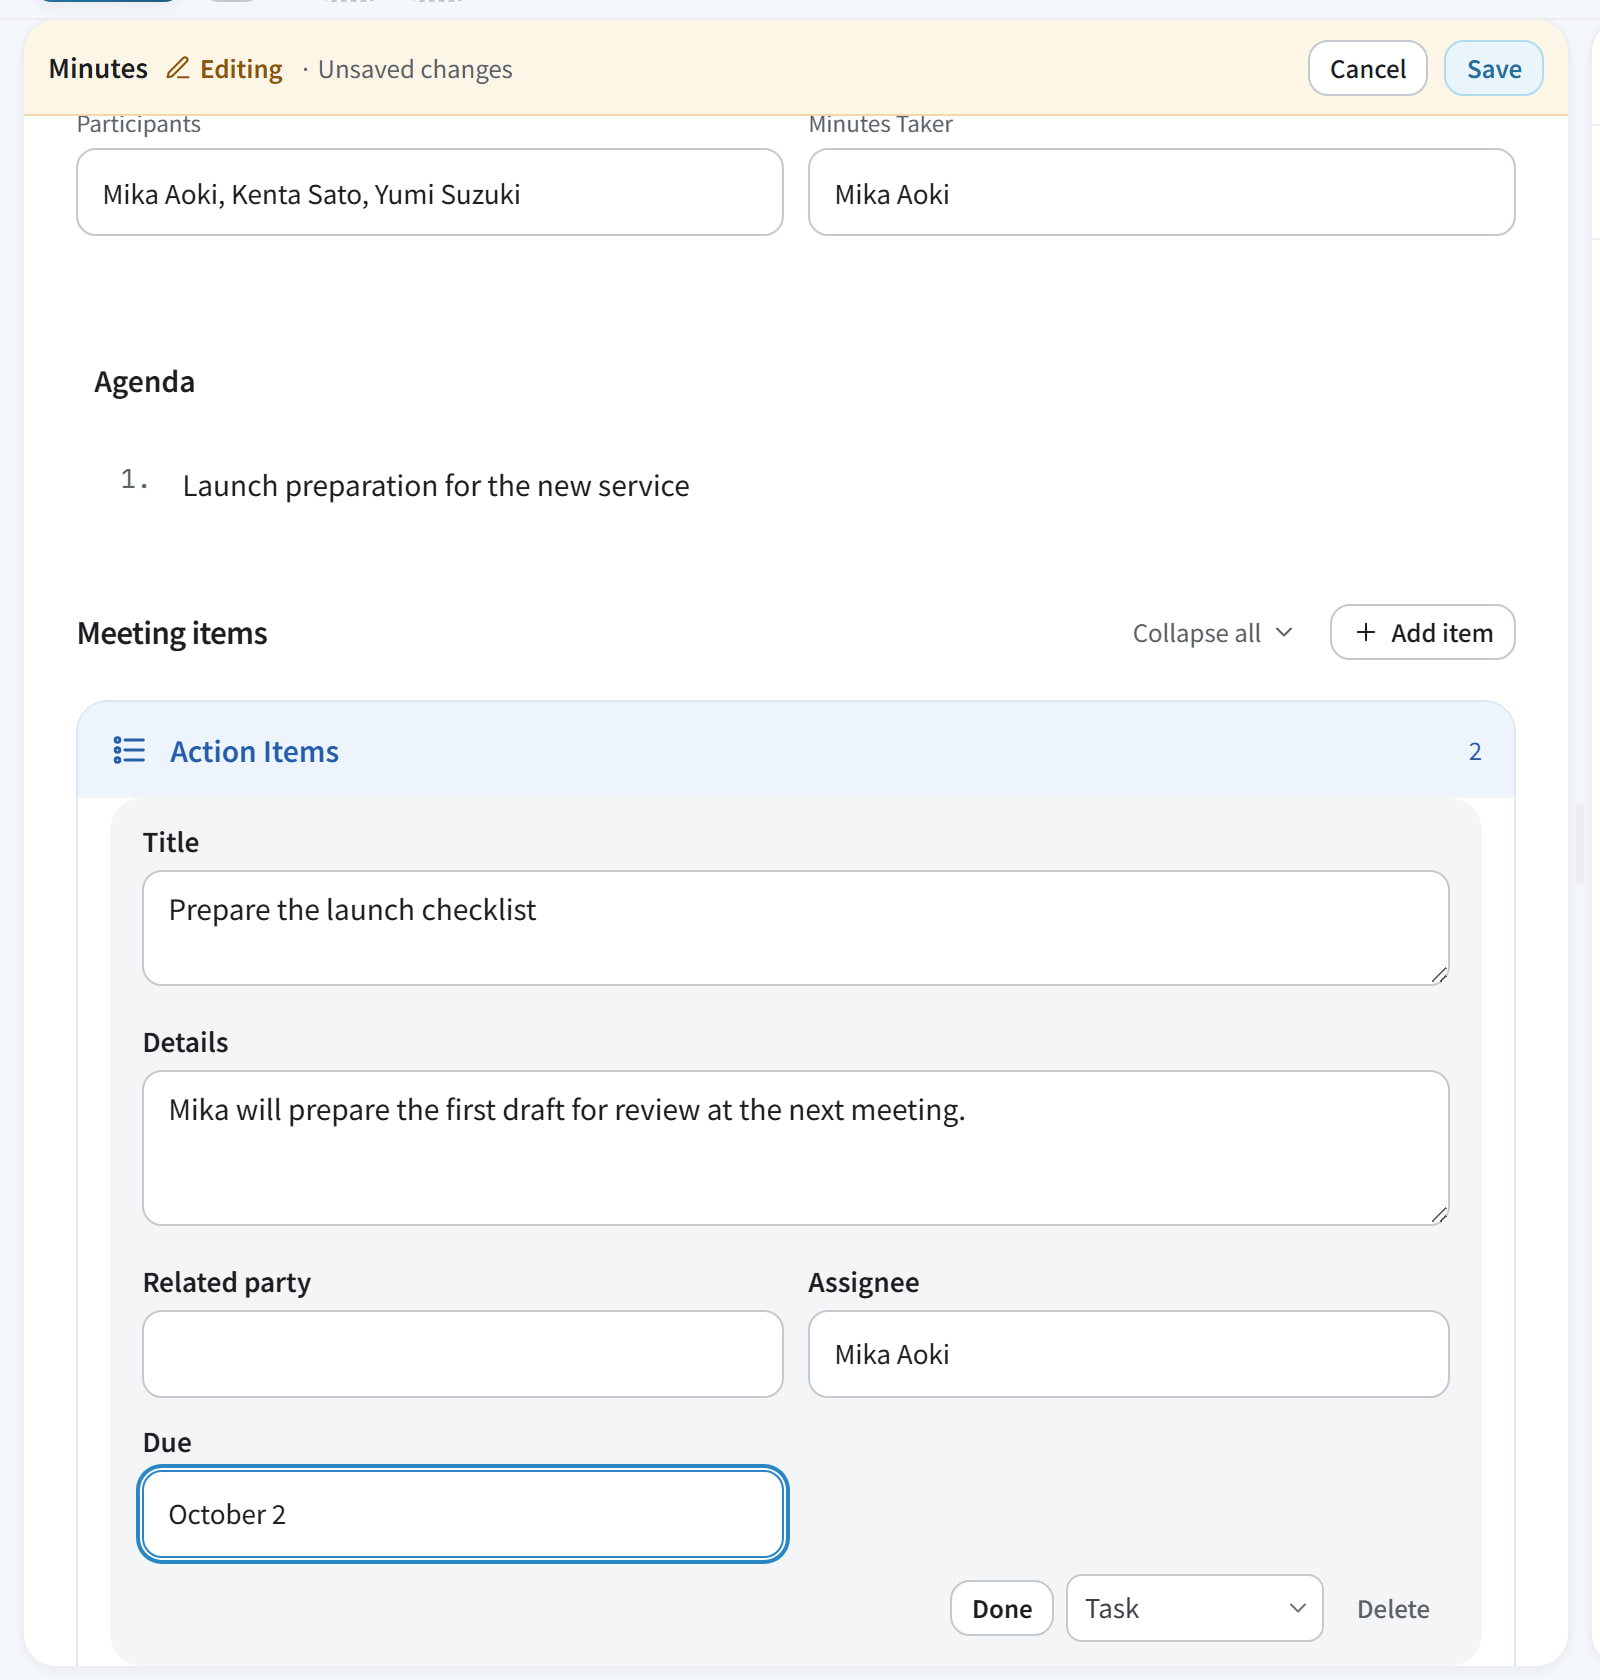
Rewrite what doesn't match
Point at the item to show its “Edit”, press it, and rewrite. Sentences in the text can be pressed and rewritten directly.
Press the item's “Done”
Press “Save” at the top
Pressing the item's “Done” alone does not save it.
Approve the minutes
Approve the minutes once you have checked them. Approval is for the whole set of minutes, not for each item.

Press the blue “Approve”
Any unsaved changes are saved first.
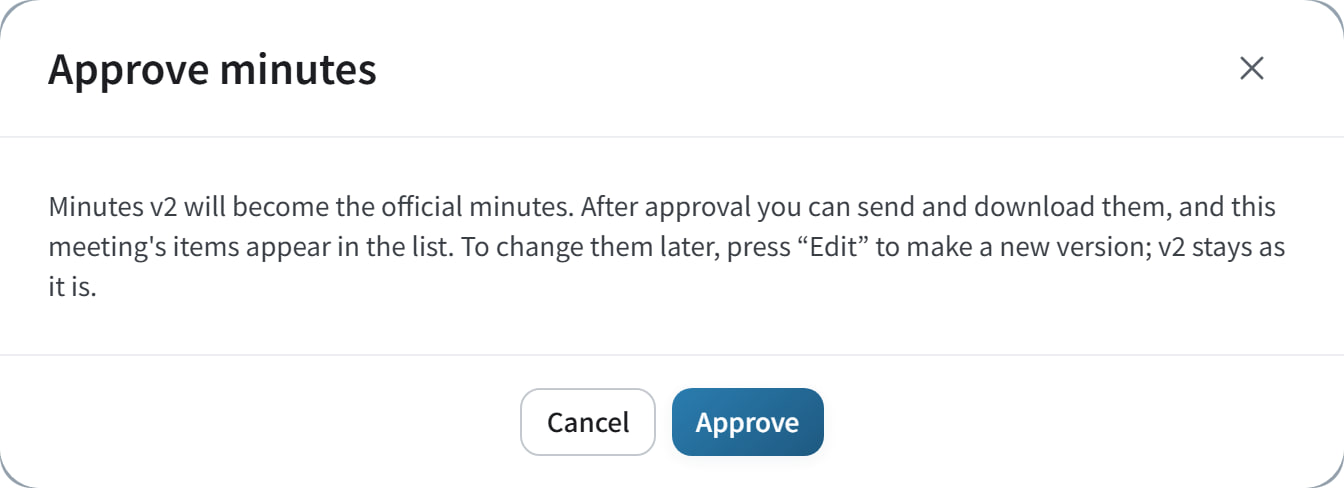
In the confirmation, press “Approve”
Check the number of the version you are approving, then press it.

It changes to “Approved”
“Send to” is now available
Save to your own list, copy items, or send to the outside services your organization uses.
Download is now available
Save as a Word or Markdown file.
How versions work
v1 Draft
Made by AI
v2 Draft
Corrected and saved
v2 Approved
Approved by the recorder
v3 Draft
Changed later and saved
An approved version is kept as it is. After further changes, approve again. Approving sends nothing to outside services.
Help
- Approve minutes(shows the steps in motion in its “Walkthrough”)app.gijito.com/en/help/approve-minutes
- Choose where to send with Send to(shows the steps in motion in its “Walkthrough”)app.gijito.com/en/help/send-menu
- Download as Word or Markdown(shows the steps in motion in its “Walkthrough”)app.gijito.com/en/help/download-minutes
STEP 6
Share, and find things later
Share with members through a folder
Every meeting is in exactly one folder. People who aren't members of that folder can't see the meeting, even if they are admins.
My meetings
Your own folder, there from the start. Usually only you can see it.
Shared folders
Folders that people create. The folder's members can see them.
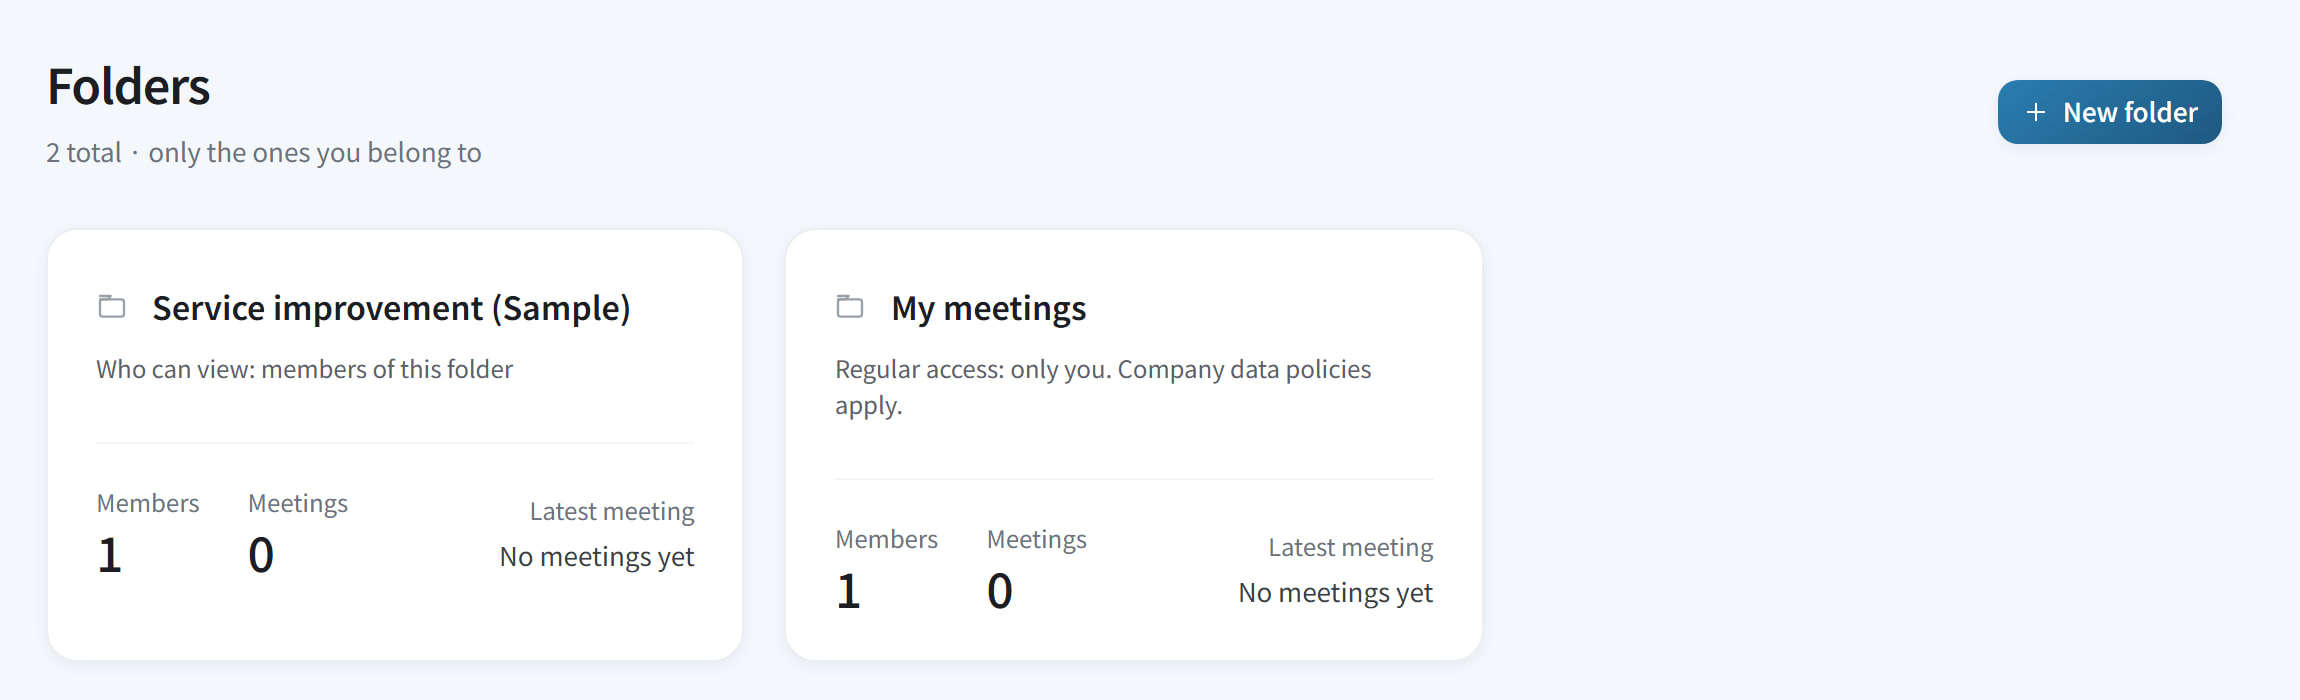
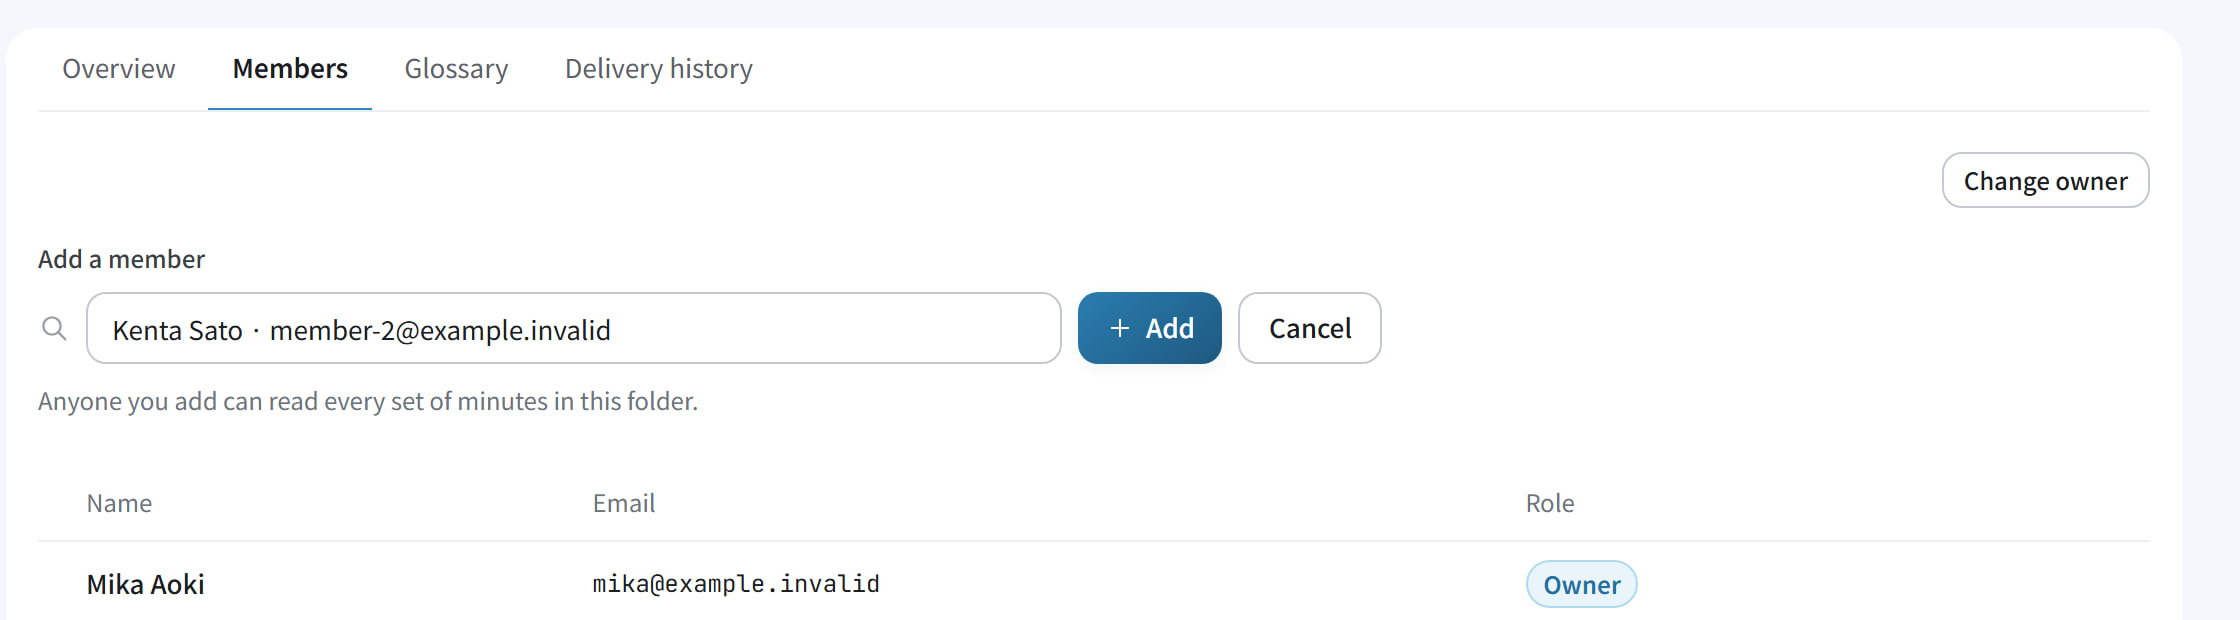
In “Folders” in the left menu, press “New folder”
Enter a “Folder name” and press “Create”. Whoever creates a folder becomes its “Owner”.
Open the new folder and press the “Members” tab
Type part of a name or email address, then choose the person
Members of your organization who aren't in the folder yet are suggested.
Press “Add”
People you add can read all the minutes in the folder, including meetings from before they joined it.
Find approved items
“Meeting items” is where you look up the items of approved minutes, across all your meetings.
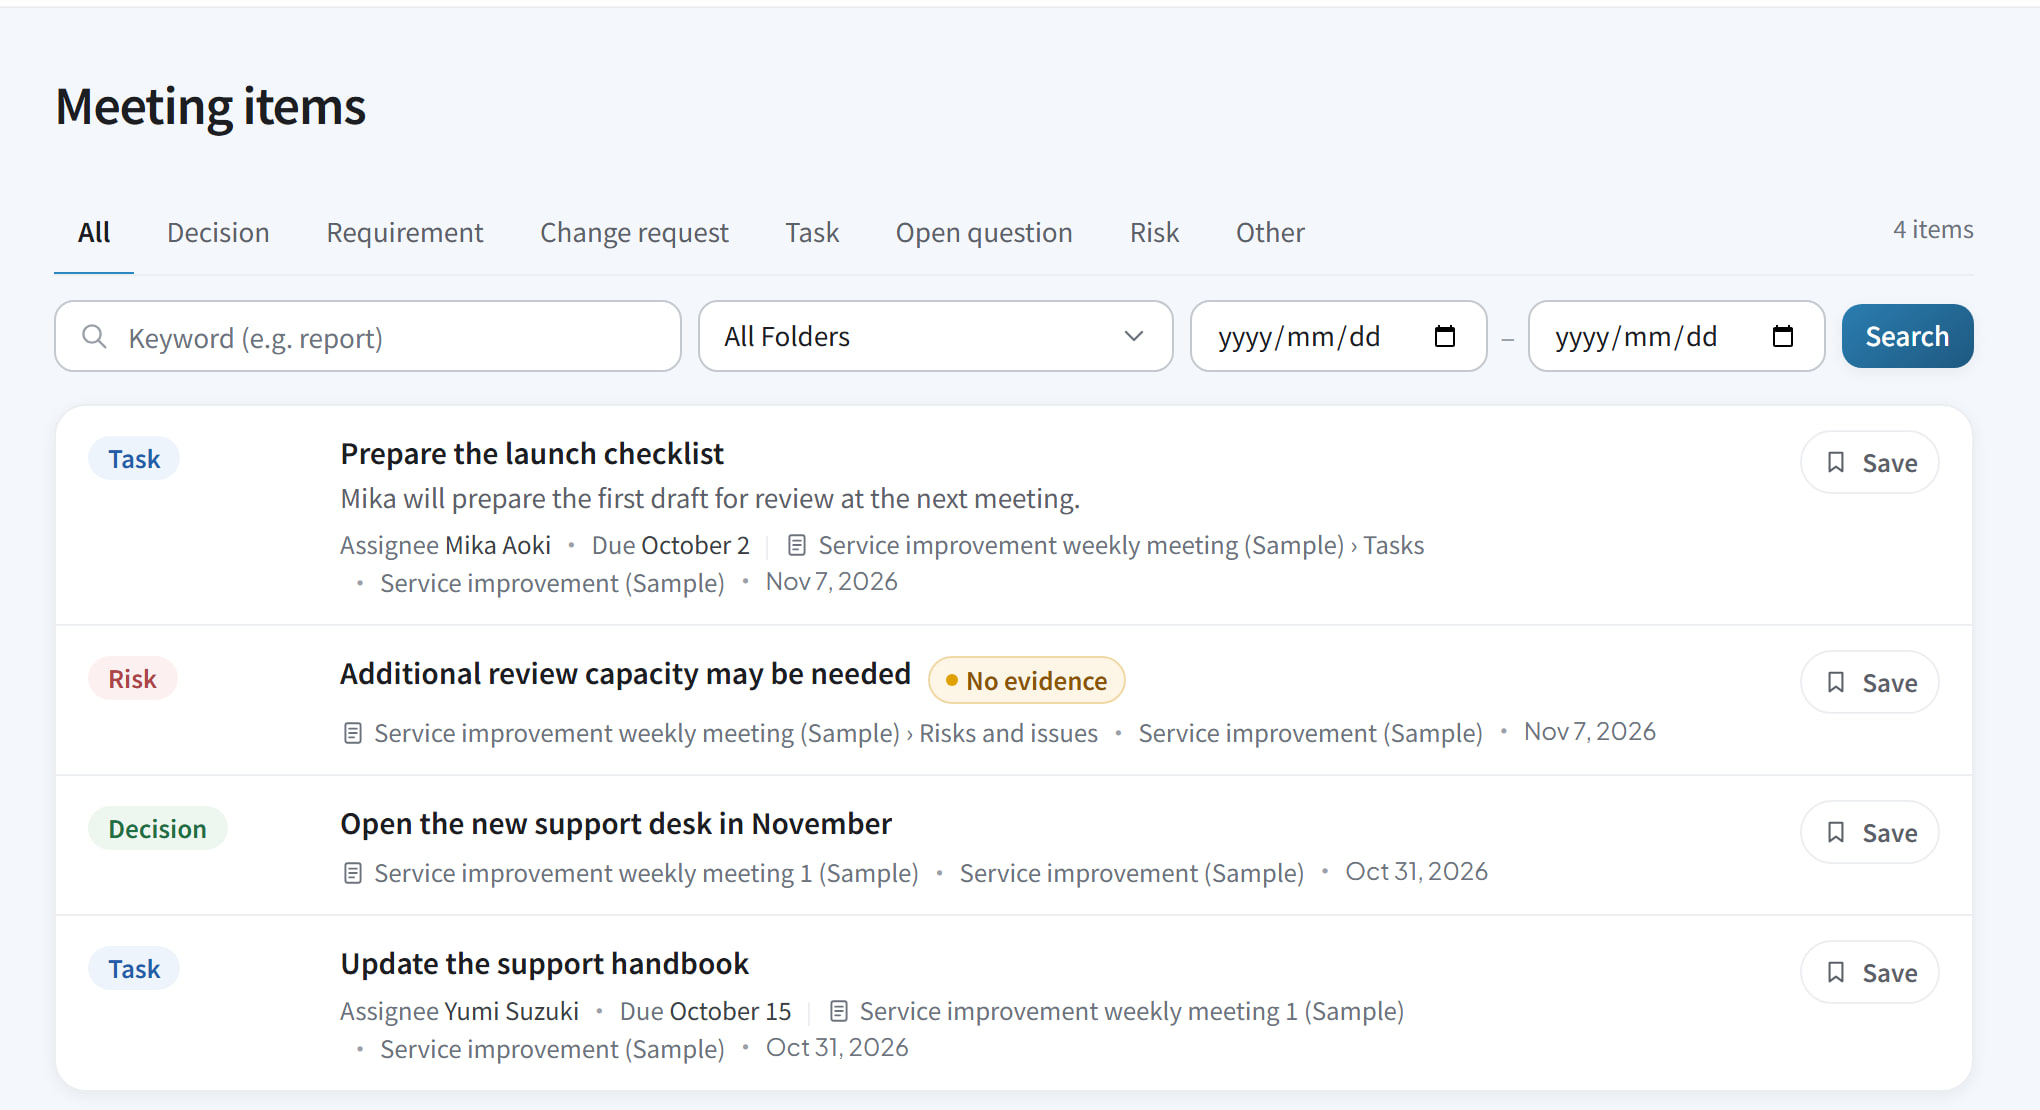
Choose a type
Tabs such as decisions and tasks.
Narrow it down
Search by keyword, folder or date.
Press an item
The minutes it comes from open.
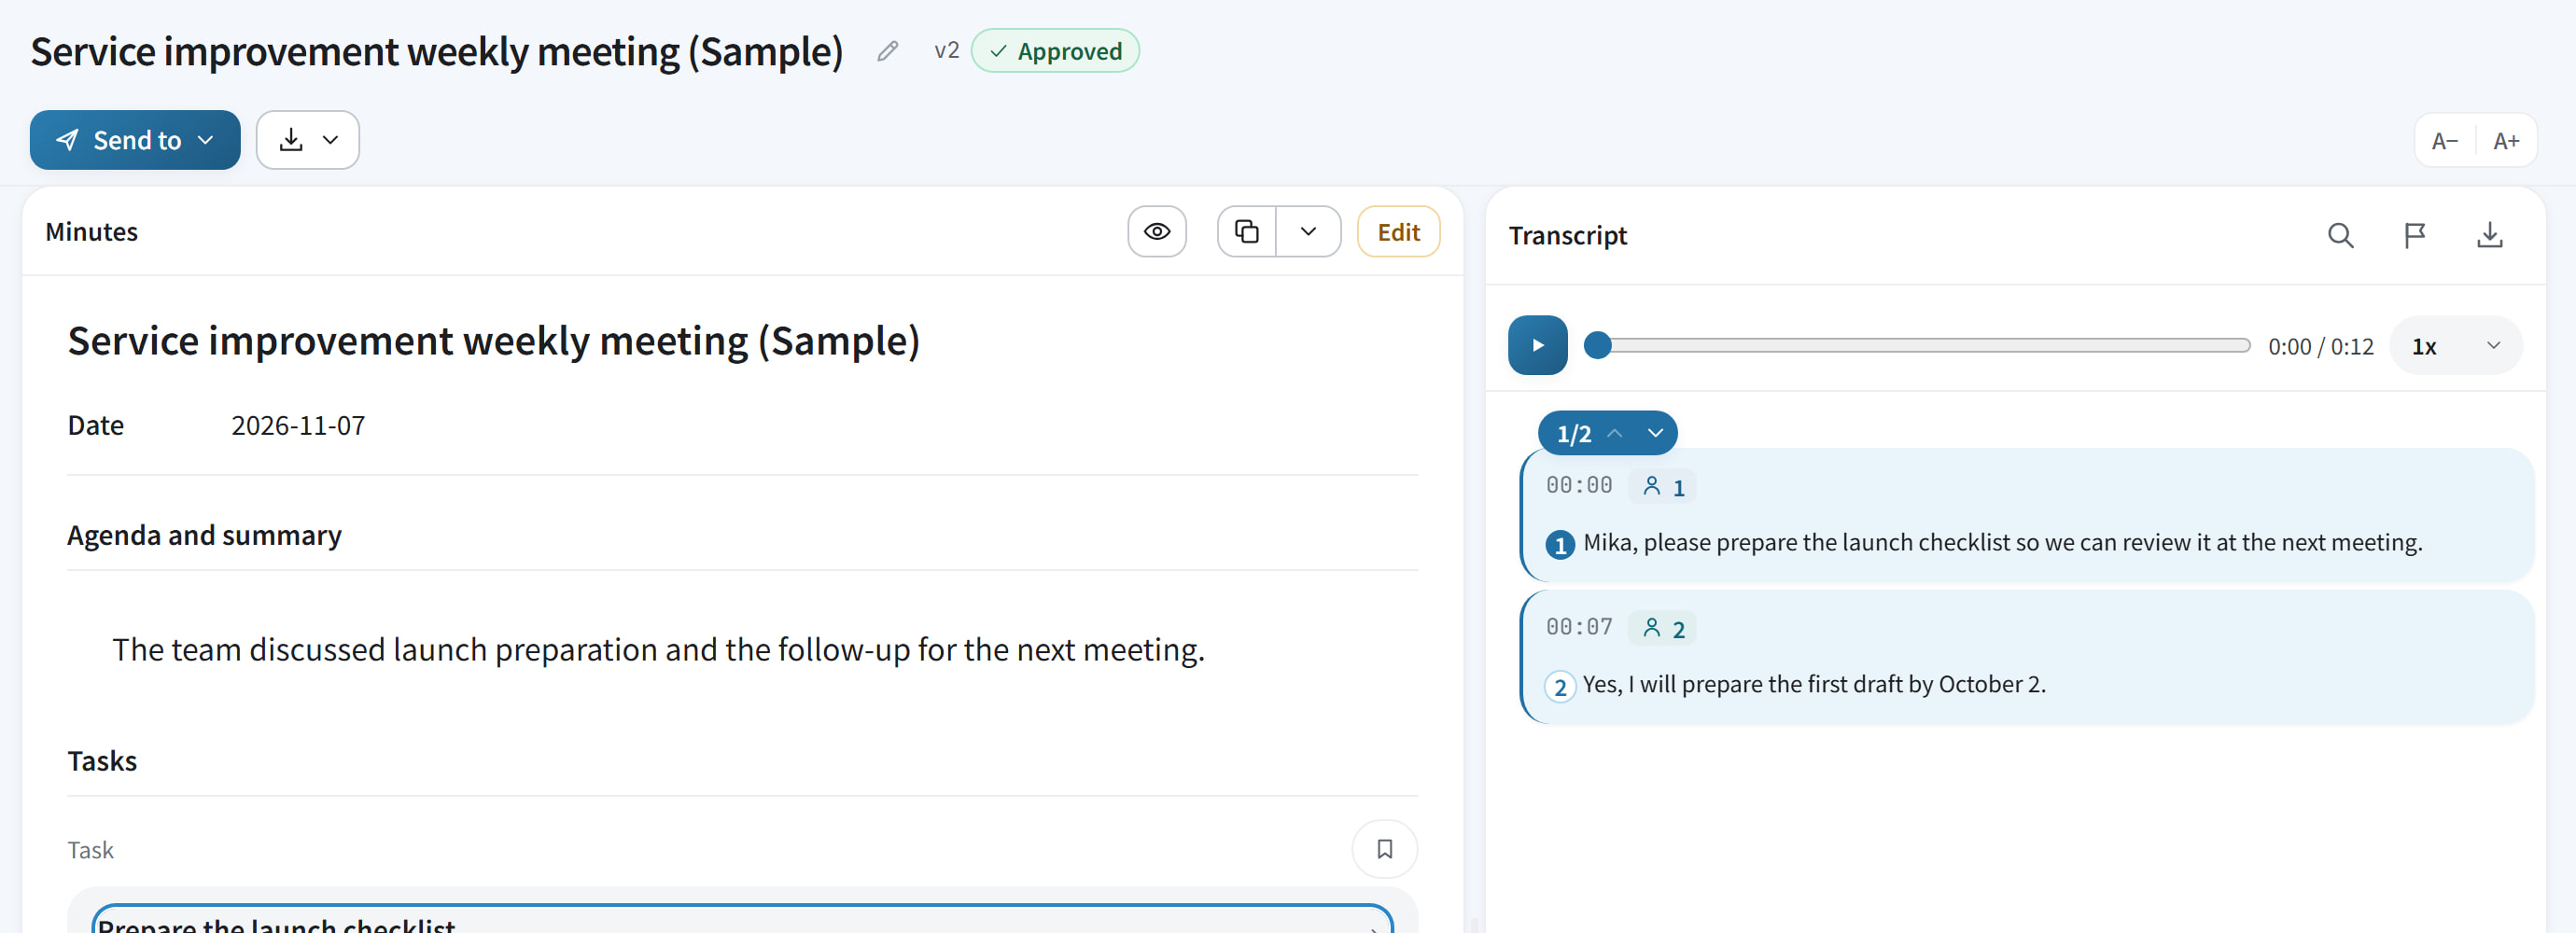
Pressing an item opens its minutes, where you can also check what was said.
Your team's progress
This screen is for finding items. Track your team's progress in Backlog, Redmine, Jira or similar tools.
Keeping track of your own tasks
Press “Save” to add an item to your “My item list”. Only you see its status and due date.
Info
About the trial period · Getting helpAbout your term of use · Getting help
About the trial period
The last day of the trial is shown in the first “Welcome to GIJITO” window. After that, we remind you on screen and by email from 7 days before the end.
7 days before the last day
A notice appears on “Meetings” for admins, and admins get an email.
The day before the last day
Admins get another email.
The last day
You can use GIJITO until the end of the day.
After the trial
New meetings can't be started.
When the end is near

After the trial has ended

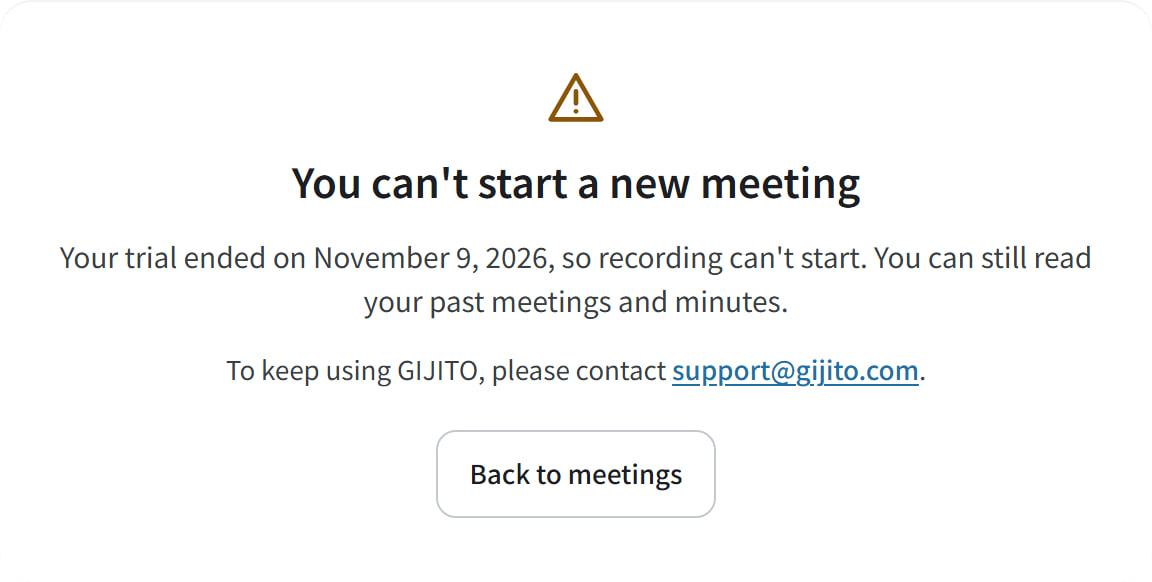
No longer available
Creating new meetings, AI features, sending to outside services
Still available to read
Your past meetings and minutes
To keep using GIJITO
Contact support@gijito.com
When your contract begins, admins get an email
Everyone with a trial seat moves to “No seat”, and can't record meetings or use AI features until they are given a seat. People still invited also join with no seat.
An admin gives out seats again
In the “Members” list, tick the people and press “Change seat” to change them all at once.
About your term of use
Before your term starts and after it ends, new meetings can't be started. The screen tells you why.
Before your term starts
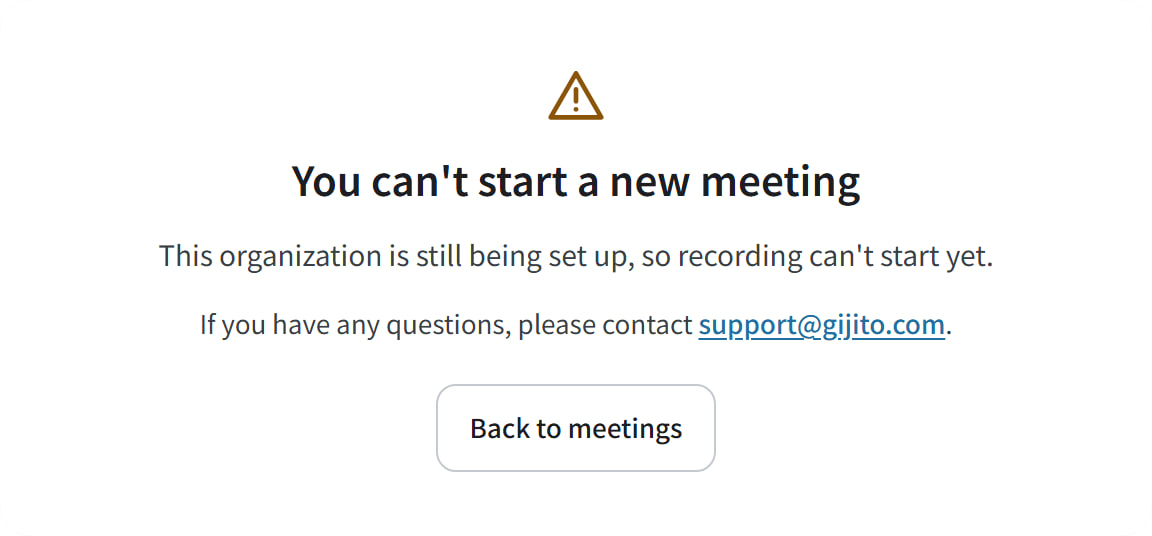
You can sign in and manage your organization, such as members and seats. Recording, AI features and sending to outside services become available when your term starts. If you have any questions, please contact support@gijito.com.
After your term has ended

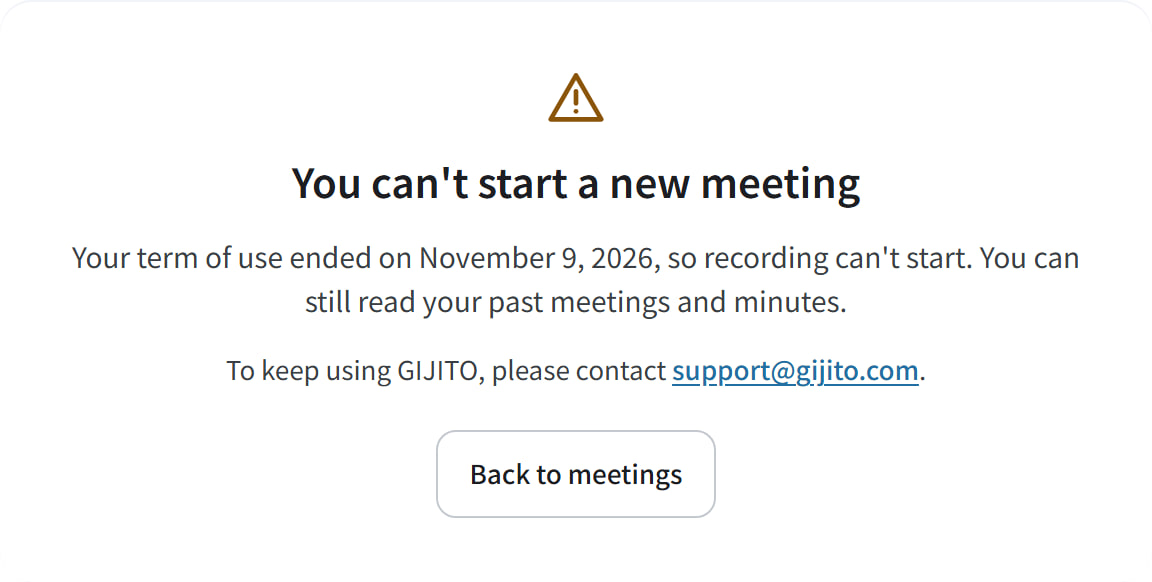
No longer available
Creating new meetings, AI features, sending to outside services
Your data after the contract
How it is handled depends on the terms of use and your contract.
To keep using GIJITO, please contact support@gijito.com.
Getting help
The Help Center explains each task in detail. Open it with “?” at the top right of the meeting screens, or from the left menu in “Organization administration”.
- I can't find the invitation email
- Please check your spam folder too. Members' emails can be sent again with “Resend”. For your own admin email, please contact support@gijito.com.
- “This address belongs to another organization, so it cannot be added.” appears
- An account can belong to only one organization. Once that person leaves their current organization, you can add them.
- The record button can't be pressed
- Without a seat, the button is faded and the reason is shown below it. Give that person a seat in “Members” under “Organization administration”.
- “Create meeting minutes” can't be pressed
- While “Saving the transcript.” is shown, wait a moment and it becomes available. Only the person who recorded the meeting can create and approve its minutes.
- “The minutes could not be created” appears
- The transcript is saved, so there is no need to record again. Press “Create again”. If that button doesn't appear, see the Help article “Minutes cannot be created”.
- I want to add another admin
- Press a name in the “Members” list to change that person's role. You can't change your own role, or the role of the last admin.
- I forgot my password
- On the sign-in screen, press “Forgot your password?” and set a new one.
Recommended Help articles
- Add and manage members(shows the steps in motion in its “Walkthrough”)sign in firstapp.gijito.com/en/help/admin/members
- Change seats and check usage(shows the steps in motion in its “Walkthrough”)sign in firstapp.gijito.com/en/help/admin/seats
- Record an online meeting(shows the steps in motion in its “Walkthrough”)app.gijito.com/en/help/record-online-meeting
- Fix missing audio or interrupted recordingapp.gijito.com/en/help/no-audio
- Minutes cannot be createdapp.gijito.com/en/help/minutes-failed
- Reset your password and sign in(shows the steps in motion in its “Walkthrough”)app.gijito.com/en/help/forgot-password
GIJITO Support
Tell us your organization's name and the message you saw, and we can help you faster.